iSEO24h Documentation
Current Version: 9.x
Structure
As iSEO24h is an HTML template, it uses a number of .html pages in conjunction with css stylesheets and a number of javascript plugins. The following is a brief overview of the files and a look at some prominent features.
We do our best while making all files for iSEO24h. Every file (HTML, CSS, JS) that was created by us has clear code, wrapped with comments - all this for your convenience.
Each demo has similar file structure:
- css - CSS styles folder
- fonts - Webfont Icon styles
- images - folder for images
- js - JavaScript files folder
- php - PHP subscription/contact script folder
- index.html - main HTML file
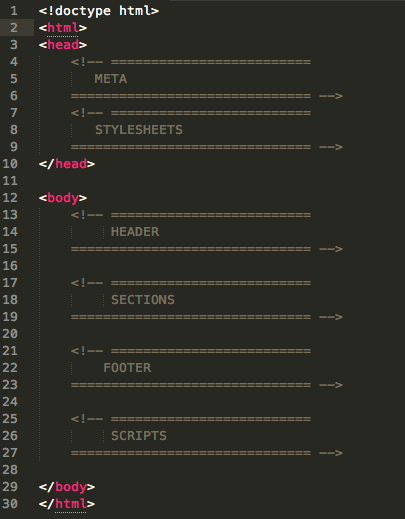
Html File Structure
This theme is built upon Twitter Bootstrap 3.3 framework and is fully responsive. It adapts to window resolution and looks good on all devices including ipad and iphone. See for yourself (resize your browser).
Grid System - Bootstrap includes a responsive, mobile first fluid grid system that appropriately scales up to 12 columns as the device or viewport size increases. The fluid grid system uses percents instead of pixels for column widths. Each row always include 12 columns (for example col-md-8 + col-md-4 = col-md-12). Bootstrap documentation: here.
A good example can be the following. We have a second row with 3 equal divs (.col-md-4) which expands in 12 columns for medium devices(less than 992px)
<div class="row">
    <div class="col-md-8">.col-md-8</div>
    <div class="col-md-4">.col-md-4</div>
</div>
<div class="row">
    <div class="col-md-4">.col-md-4</div>
    <div class="col-md-4">.col-md-4</div>
    <div class="col-md-4">.col-md-4</div>
</div>
<div class="row">
    <div class="col-md-6">.col-md-6</div>
    <div class="col-md-6">.col-md-6</div>
</div>
Page Structure - The general structure is the same in all the html theme files. Here is the general structure:
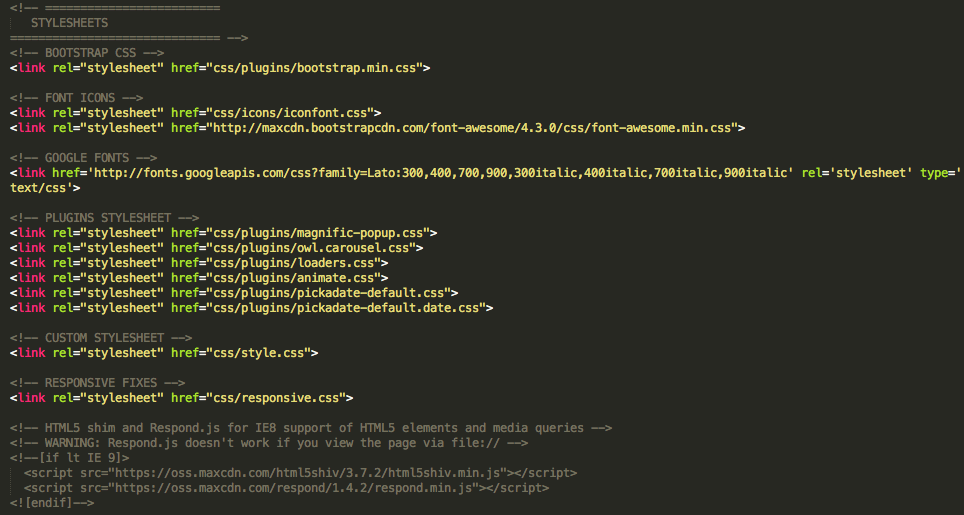
Css File Structure
We are using 11 CSS files across template. We separated styles for improving convenience to edit this template. If you're going to use this template in production we recommend you to merge all stylesheets in one file (for decreasing http queries).
Javascript File Structure
All javascripts are placed in folder /js. In custom.js file we implement all functions calls.
This theme uses following Javascript files:
- Bootstrap 3.3 framework
- jQuery 1.11 - A fast javascript library that simplifies how to traverse HTML documents, handle events, perform animations.
- jQuery Easing - jQuery with the jQuery Easing Plugin is the easiest way to describe animation with easing.
- Owl Carousel - a popular jQuery plugin which is used for building touch enabled slider. Developed by Owl Graphic.
- jQuery countTo - a jQuery plugin that will count up (or down) to a target number at a specified speed, rendered within an HTML DOM element.
- jCounter - a simple light-weight extensible jQuery plugin that helps you create various date-based countdowns, countups and custom timers.
- Formchimp - A customizable MailChimp ajax plugin for jQuery, provides an easy and lightweight way to let your users sign up to your MailChimp list. Developed by Fabio Quarantini.
- Magnific Popup - A responsive lightbox & dialog script with focus on performance and providing best experience for user with any device. Documentation here
- Vide Video Plugin - A Plugin that add a background video. on Github
- Pickadate.js - A mobile-friendly, responsive, and lightweight jQuery date & time input picker. Documentaion here.
- WOW.js - a jQuery plugin which initiates animation effect on scroll. Created by Matthieu Aussaguel
- Twitter Fetcher - This plugin allows you to get your tweets displaying on your website using JavaScript, without using new Twitter 1.1 API. Github here
Fonts
iSEO24h uses "Lato" Google WebFont.
You can choose other fonts from google directory editing this line of code in the <head> section.
<!-- GOOGLE FONTS -->
<link href='https://fonts.googleapis.com/css?family=Lato:300,400,700,900,300italic,400italic,700italic,900italic' rel='stylesheet' type='text/css'>
If you want to import new font from Google Webfont library, don't forget to change property in CSS style: font-family with correct font name.
<!-- in css/style.css -->
body {
    font-family: "Lato", "Helvetica Neue", Helvetica, Arial, sans-serif;
}
Page Builder
HTML Builder is a Javascript script which allows users to customise HTML templates in a quick and easy way. HTML Builder allows basic content editing, allowing users to changes link text, headers and other written content.
HTML Builder runs (almost) entirely in the browser. The only server side code is in the form of a single PHP file used for exporting HTML markup.
Builder Features
Drag and drop
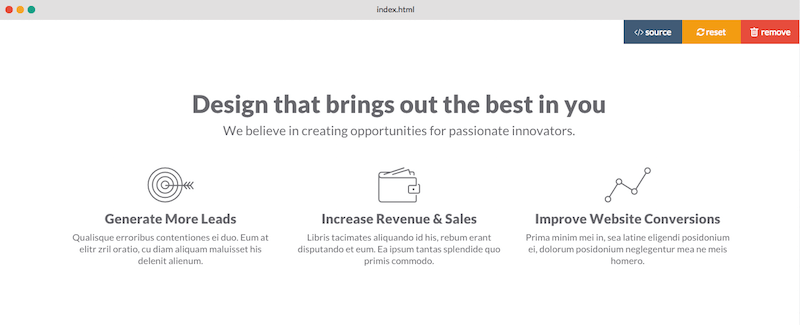
HTML Builder allows users to drag HTML elements onto a canvas and drop them where they'd like them to appear. Once dropped onto the canvas, the position can be changed by dragging and dropping as well. Elements can be delete individually or all elements on the current page can be deleted in one go.
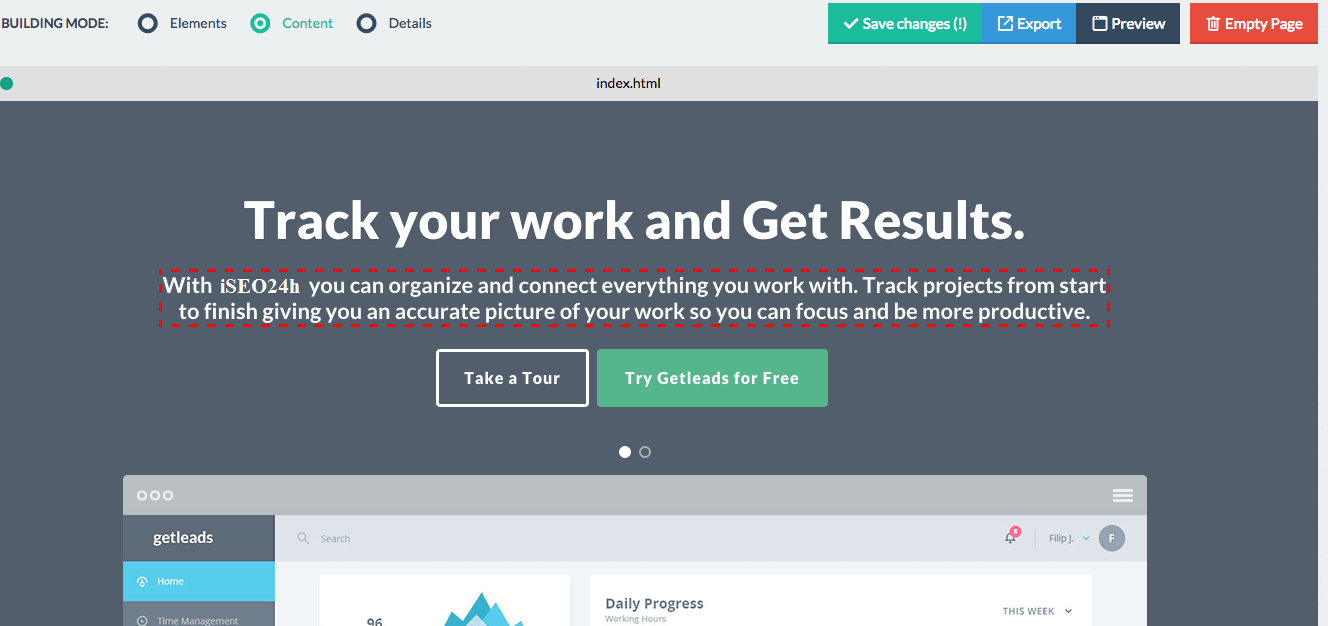
Content Editing
The HTML Builder script can also be used to edit written content inside each element (simply by setting the "building mode" to "content"). HTML Builder uses a rich text editor, allowing to make changes to the written content. Depending on what type of element you're editing, certain options will be disabled in the editor. Editable text elements will need to be configured through "/js/builder.js", and depending on the exact configuration, certain text elements might not be editable.
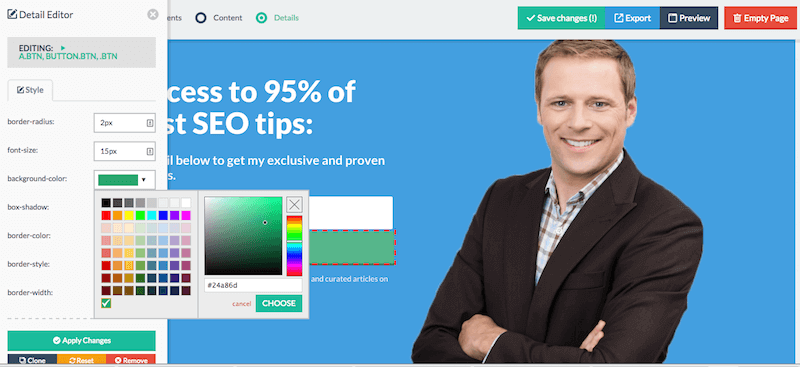
Style/detail editing
The HTML Builder script also allows for basic CSS editing and link editing. When editing a link, you can point the link to either an internal page or an (external) URL.
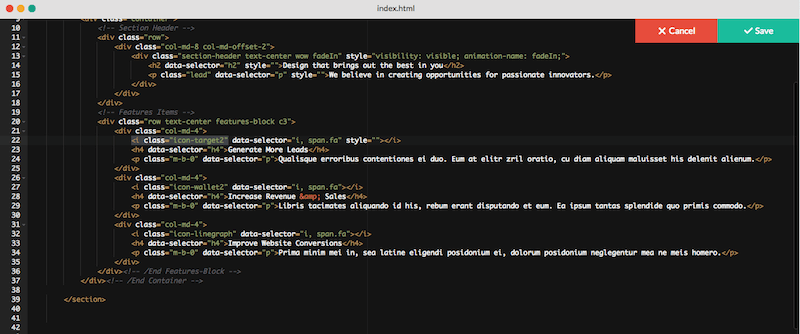
Source Code editing
The HTML Builder script provides the ability to act directly on the html code of the section you want to change, through the "<>source" button. This allows you to make simple adjustments using basic html code. For example you can change dropdown links, form placeholders, icon class names, etc.
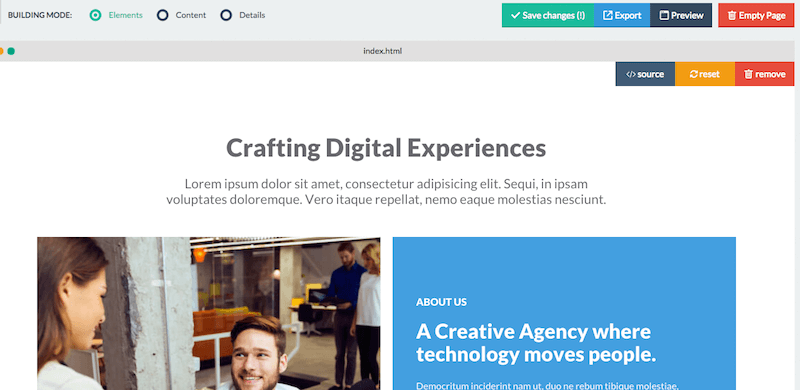
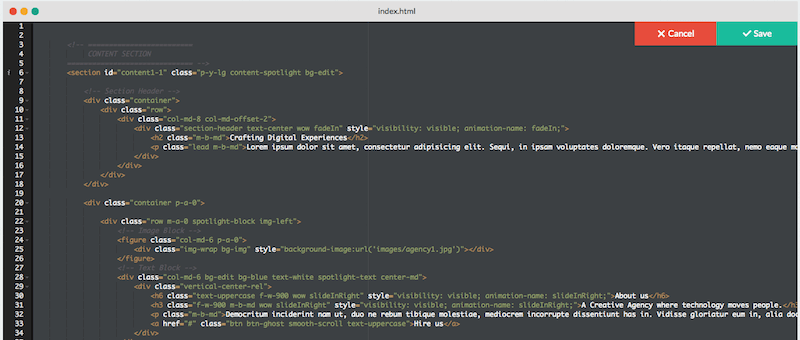
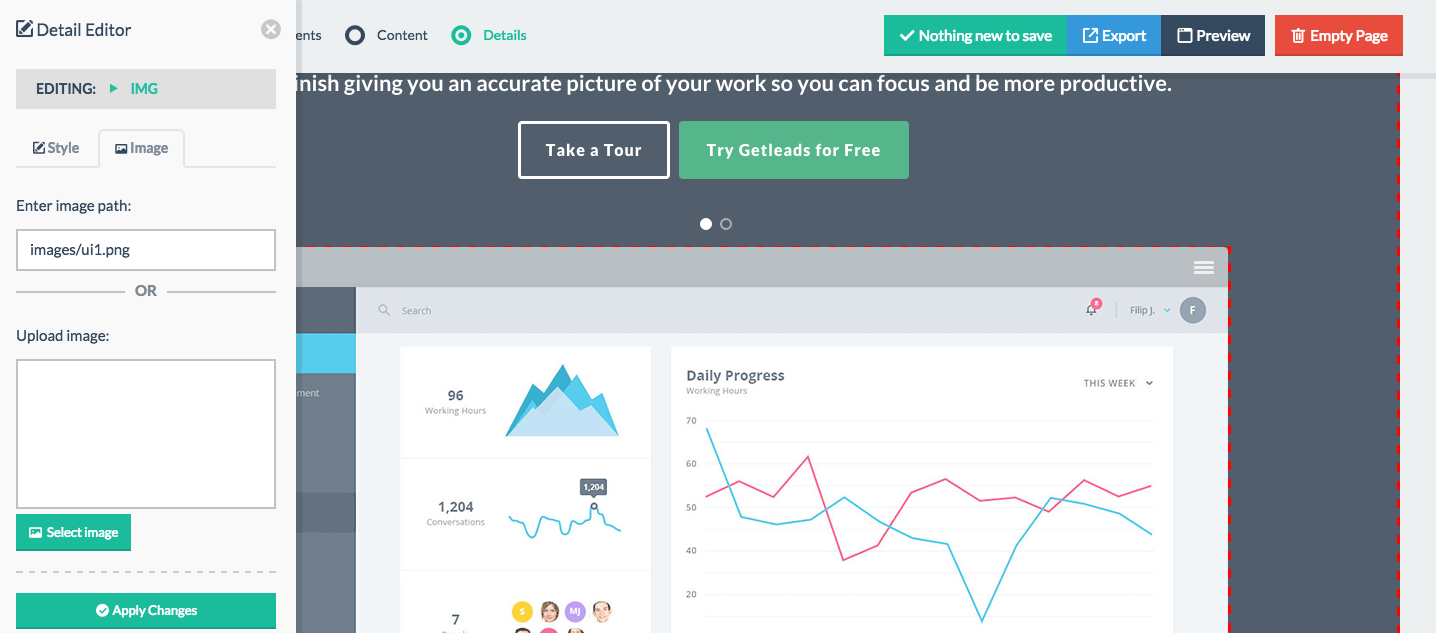
Image editing
The HTML Builder script allows you to edit images as well. To edit images on the canvas, firstly select the Details building mode, this will allow you to select images. When selected, a "image" tab will be visible in the left panel, allowing you to either upload an image or enter a URL manually.
- To change the image, input new image url inside url(), for example:
url(yourdomain.com/image.png)
- To remove the image, just input "url()"
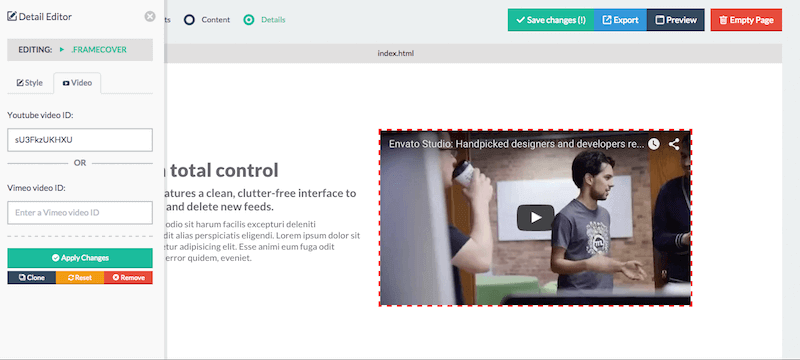
Video editing
HTML Builder allows you to edit Youtube and Vimeo videos as well. To edit a video, switch to "Details Mode" and click the video you'd want to edit. This will open the left sidebar panel where you can enter a Youtube video ID or a Vimeo video ID. You can alter between these as you please, the application will detect which platform you're using and update the video accordingly.
Cloning Items
Switch to "Details" building mode, select the item which you want to clone and finally click the clone button from the left panel. Please note that cloned items will be inserted into the canvas right next to the original item.
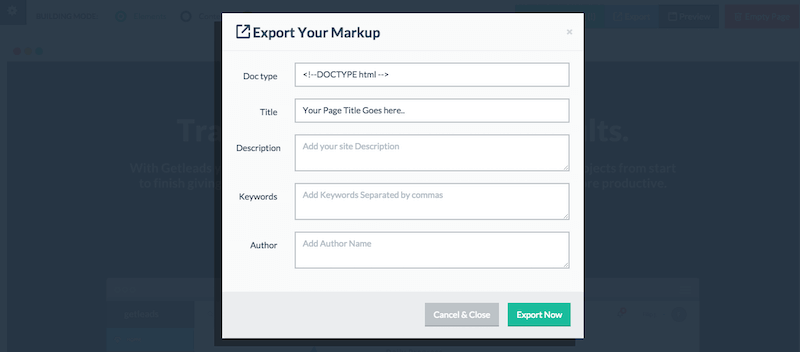
Export HTML
The created markup can be exported by click the blue export button. The export feature will grab all the used HTML elements for each created page. Once all pages are completed, all the HTML files are bundled into a ZIP archive together with the other external resources like stylesheets, Javascript files, images and php scripts.
Export/Import Project
You can at any time export a copy of the landing page project you are working on as a ".xs" file which you can import it later to the builder and continue editing. To export or import a project open the left sidebar and click on the button "Export/Import Project" in the bottom of the sidebar.

Pages
The HTML Builder script allows you to create multiple pages at once. To add a new page, simply click the green button labeled "+ Add" just below the current pages list. You can alter the page names as well (please use names without the .html extension, these are added automatically during the export). When exporting the markup, the pages will use the same names. To delete a page, simply click the little delete icon next to the page you'd like to delete.

Elements
Icons Pack
iSEO24h uses a custom Icon Kit constructed using Icomoon. For a full reference list for each icon go here.
iSEO24h uses also the FontAwesome Icons. Using these icon packs is a simple matter of knowing the correct class to use.
Icons use the 'i' element and each have their own unique class which dictates which glyph is shown. For a full list of available classes, see the links provided above.
<i class="icon-rocket"></i>
This code would result in the Rocket icon.
Into the builder you can change by "details" option only the icons belong to the Font-Awesome package. To change other icons you can just use the "source" button and edit icon class by the editor.
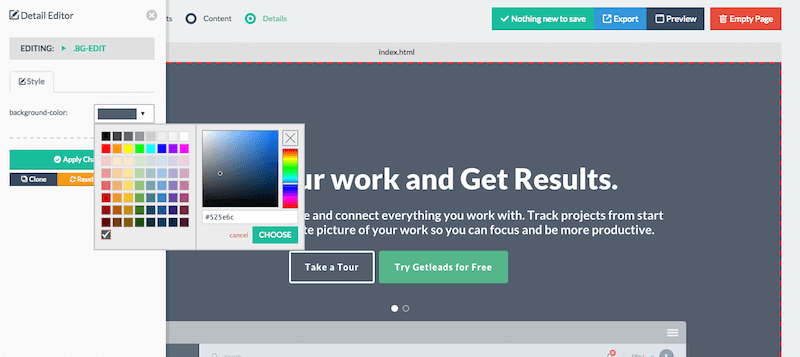
Colour Schemes
iSEO24h ships with 10 different predefined colour schemes used for the buttons and the backgrounds. Using HTML Builder, you can change the colour scheme simply by clicking, in the "Details" mode, on the Background or on the Button and selecting your desired scheme from the swatches on the sidebar.
Outside of HTML Builder you will need to include the appropriate CSS class for the section or button you want to use. For example, if you wanted to use the 'Blue' background in a section with a green and a white button you would include the following:
<section class="bg-blue">
...
        <a class="btn btn-white">TAKE A TOUR</a>
        <a class="btn btn-green">GET ACTION</a>
...
</section>
Below you can find the respective color classes:
bg-grey{
    background-color: #EFF1F4;
}

.bg-light{
    background-color: #fafafa;
}

.bg-orange {
    background-color: #ef7c46;
}

.bg-blue {
    background-color: #439FE0;
}

.bg-green {
    background-color: #56B68B;
}

.bg-red {
    background-color: #e74c3c;
}

.bg-purple {
    background-color: #8e44ad;
}

.bg-yellow {
    background-color: #f1c40f;
}

.bg-dark {
    background-color: #525e6c;
}

.bg-black {
    background-color: #2e3234;
}

.bg-white {
    background-color: #ffffff;
}
CSS helper classes
iSEO24h provides many classes to help you in the positioning of the sections and the elements through the site. In this way you can easily edit margin, padding and center contents directly by adding the following classes in your html code:
/* margin */
.m-a-0 { margin:        0 !important; }
.m-t-0 { margin-top:    0 !important; }
.m-r-0 { margin-right:  0 !important; }
.m-b-0 { margin-bottom: 0 !important; }
.m-l-0 { margin-left:   0 !important; }
.m-x-0 { margin-right:  0 !important; margin-left:   0 !important; }
.m-y-0 { margin-top:    0 !important; margin-bottom: 0 !important; }

.m-a { margin:        10px !important; }
.m-t { margin-top:    10px !important; }
.m-r { margin-right:  10px !important; }
.m-b { margin-bottom: 10px !important; }
.m-l { margin-left:   10px !important; }
.m-x { margin-right:  10px !important; margin-left: 10px !important; }
.m-y { margin-top:    10px !important; margin-bottom: 10px !important; }
.m-x-auto { margin-right: auto !important; margin-left: auto !important; }

.m-a-md { margin:        25px !important; }
.m-t-md { margin-top:    25px !important; }
.m-r-md { margin-right:  25px !important; }
.m-b-md { margin-bottom: 25px !important; }
.m-l-md { margin-left:   25px !important; }
.m-x-md { margin-right:  25px !important; margin-left:   25px !important; }
.m-y-md { margin-top:    25px !important; margin-bottom: 25px !important; }

.m-a-lg { margin:        50px !important; }
.m-t-lg { margin-top:    50px !important; }
.m-r-lg { margin-right:  50px !important; }
.m-b-lg { margin-bottom: 50px !important; }
.m-l-lg { margin-left:   50px !important; }
.m-x-lg { margin-right:  50px !important; margin-left:   50px !important; }
.m-y-lg { margin-top:    50px !important; margin-bottom: 50px !important; }

.new-row-md,
.new-row-sm { margin-top: 40px; }

/* padding */
.p-a-0 { padding:        0 !important; }
.p-t-0 { padding-top:    0 !important; }
.p-r-0 { padding-right:  0 !important; }
.p-b-0 { padding-bottom: 0 !important; }
.p-l-0 { padding-left:   0 !important; }
.p-x-0 { padding-left:   0 !important; padding-right: 0 !important; }
.p-y-0 { padding-top:    0 !important; padding-bottom: 0 !important; }

.p-a { padding:        30px !important; }
.p-t { padding-top:    30px !important; }
.p-r { padding-right:  30px !important; }
.p-b { padding-bottom: 30px !important; }
.p-l { padding-left:   30px !important; }
.p-x { padding-right:  30px !important; padding-left:   30px !important; }
.p-y { padding-top:    30px !important; padding-bottom: 30px !important; }

.p-a-md { padding:        60px !important; }
.p-t-md { padding-top:    60px !important; }
.p-r-md { padding-right:  60px !important; }
.p-b-md { padding-bottom: 60px !important; }
.p-l-md { padding-left:   60px !important; }
.p-x-md { padding-right:  60px !important; padding-left:   60px !important; }
.p-y-md { padding-top:    60px !important; padding-bottom: 60px !important; }

.p-a-lg { padding:        120px !important; }
.p-t-lg { padding-top:    120px !important; }
.p-r-lg { padding-right:  120px !important; }
.p-b-lg { padding-bottom: 120px !important; }
.p-l-lg { padding-left:   120px !important; }
.p-x-lg { padding-right:  120px !important; padding-left:   120px !important; }
.p-y-lg { padding-top:    120px !important; padding-bottom: 120px !important; }

/* centering elements vertically in relation to the height of the section */
.vertical-center-abs, .vertical-center-rel{
    top: 50%;
    -webkit-transform: translateY(-50%);
    -moz-transform: translateY(-50%);
    -o-transform: translateY(-50%);
    -ms-transform: translateY(-50%);
    transform: translateY(-50%);
}

.vertical-center-abs {
    position: absolute;
}

.vertical-center-rel {
    position: relative;
}

/* centering elements vertically and horizontally in relation to the size of the section */
.vh-center {
    position: absolute;
    top: 50%;
    left: 50%;
    margin-right: -50%;
    -webkit-transform: translate (-50%, -50%);
    -moz-transform: translate (-50%, -50%);
    -o-transform: translate (-50%, -50%);
    -ms-transform: translate (-50%, -50%);
    transform: translate (-50%, -50%);
}

/* centering elements vertically in relation to other elements in the same row */
.y-middle {
    display: -webkit-flex;
    display: -moz-flex;
    display: -ms-flexbox;
    display: flex;
    align-items: center;
    -webkit-align-items: center;
    justify-content: center;
    -webkit-justify-content: center;
    flex-direction: row;
    -webkit-flex-direction: row;
}

.content-align-md .y-middle {
    display: block!important;
}
Header Navigation
A header tag with the class header creates a header which is on top of the template. It has a 12-column structure like all the sections on the site. The structure of header has many variants that can be added or remove.
iSEO24h provides 4 types of navigation, and for each type you can use different variants: fixed on top, static on top, with a transparent background and with a solid color background. In this case it is necessary to act through code and not via html builder uncommenting the variant you want to use.
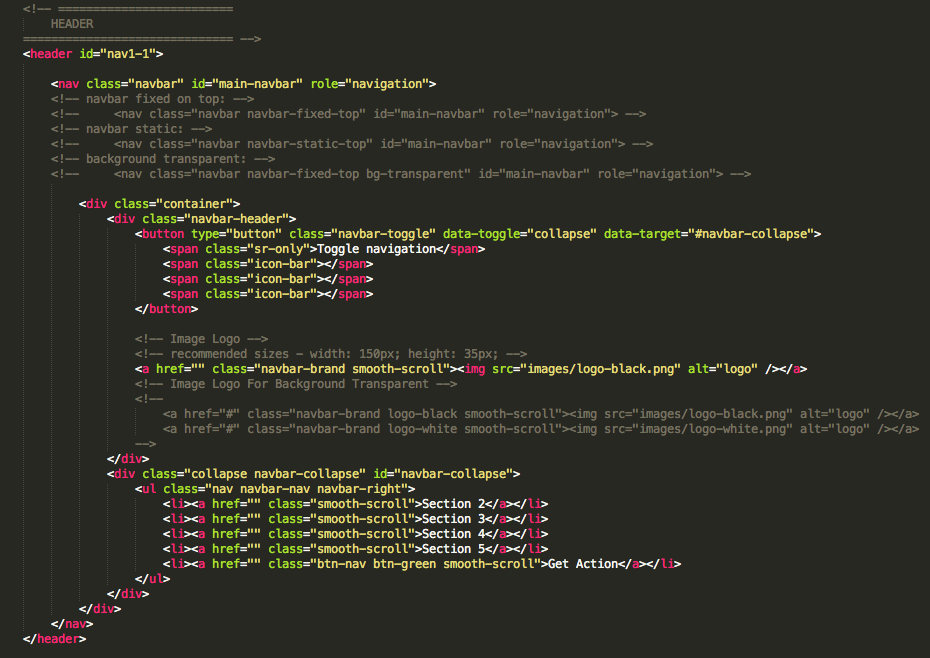
For example, after exporting your folder from html builder, you can replace in your index.html the standard navigation header:
<nav class="navbar" id="main-navbar" role="navigation">
with (for a navigation fixed on top with transparent background) :
<nav class="navbar navbar-fixed-top bg-transparent" id="main-navbar" role="navigation">
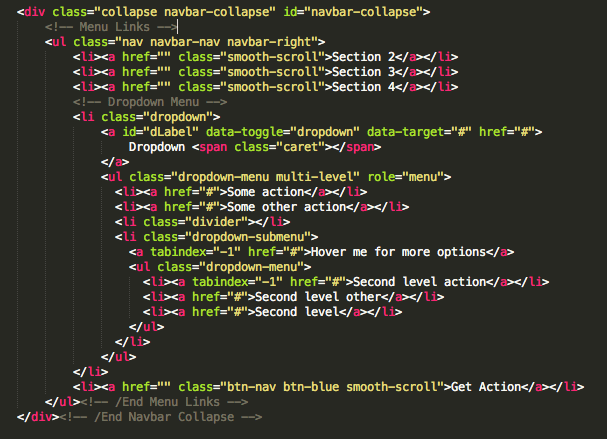
Navigation with Dropdown
iSEO24h also provides the possibility to introduce a dropdown menu in the header navigation. This menu can't be directly created through builder, but you could act through "source code" or editing the final exported html file.
Preloader
Before the main contents of the website are loaded, there is an opportunity to show the preloader of the site. If you don’t need the preloader, just delete the following div in your index.html:
<div class="loader bg-green">
    <div class="loader-inner ball-scale-ripple-multiple vh-center">
        <div></div>
        <div></div>
        <div></div>
    </div>
</divv
Back to Top Button
The "Back to Top" link allows users to smoothly scroll back to the top of the page. It's a little detail which enhances navigation experience on website with long pages. You can enable it on your page by uncommenting in your index.html these lines of code at the end of the file:
<!-- Back to Top Button -->
<!--
<a href="#" class="top">Top</a>
-->
Animation Effects
iSEO24h uses WOW plugin to trigger animations on scroll. It used Animate.css for CSS animation. You will find all the animations in Animate.css website. To learn more about WOW please read the plugin's Documentation here:
<div class="nameClass wow nameAnimation">Content here<div>

<!-- Example: -->
<div class="col-sm-4 wow fadeIn">Content here<div>
Video Background
In iSEO24h for video background we used a specific js plugin - Vide.js. This plugin requires use of video in several formats like '.webm', '.ogv' and '.mp4' for cross browser compatibility. It also requires a poster ( a screenshot of the video) with .jpg, .png or .gif extension.
path/
├── to/
│   ├── video.mp4
│   ├── video.ogv
│   ├── video.webm
│   └── video.jpg
For this reason it's not possible to use the "upload form" of the builder as we do with images. To optimize performance we have disabled the video in the builder canvas, but in the preview and in the exported files the video works properly.
You can edit the video in the following ways:
1 - by replacing the files directly in the folder of the builder ( Builder/elements/images/video/ ). it is important that the name remains unchanged. this way you can use the builder with your desired video already set.
2 - by replacing the files into the folder images/video of the exported file from the builder.
3 - by changing the path in js/custom.js(line n.121) of the exported file from the builder.
$('.video-play').vide("images/video/video", {
    posterType: "jpg"
});
note. if you want to turn off the alert pop-up that produces the background video section in the builder canvas, just follow these simple steps:
- open with a html text editor Builder/elements/hero1-2.html and Builder/elements/video1-1.html
- delete the script code at the end of the files:
<script>
    if (window.frameElement) {
        alert("Video Background in Builder Canvas is disabled to optimize performance. in Preview mode and in the Exported Files it works properly.\nTo edit the video, please follow the documentation in Elements>Video Background. Thanks")
    }
</script>
- save your changes.
Twitter Feed
With the Twitter Fetcher plugin you can simply show your preferred twitter feed in your site by editing the "screenName" option into the js/custom.js file (line n.236)
"profile": {"screenName": 'envato'},
Counter
Fun Facts Section uses a plugin that will count up (or down) to a target number at a specified speed. Just define the right data-* attributes with the right values.
<div class="counter" data-from="0" data-to="350" data-speed="1000"></div>
Countdown Timer
Countdown Timer Section uses a plugin that helps you create various date-based countdowns, countups and custom timers. It comes with server-side timezone support to display accurate countdowns across the globe. You can simply change the deadline date and the end message by editing js/custom.js (line 289)
$(".countdown").jCounter({
    date: "16 december 2016 9:00:00", // Deadline date
    timezone: "Europe/London",
    format: "dd:hh:mm:ss",
    twoDigits: 'on',
    serverDateSource: "php/dateandtime.php",
    fallback: function() {console.log("Count finished!")}
});
Forms
Mailchimp Subscription
Current active subscribe form will save emails to your mailchimp list. If you don't have a Mailchimp account you alternative could use the simple php form above.
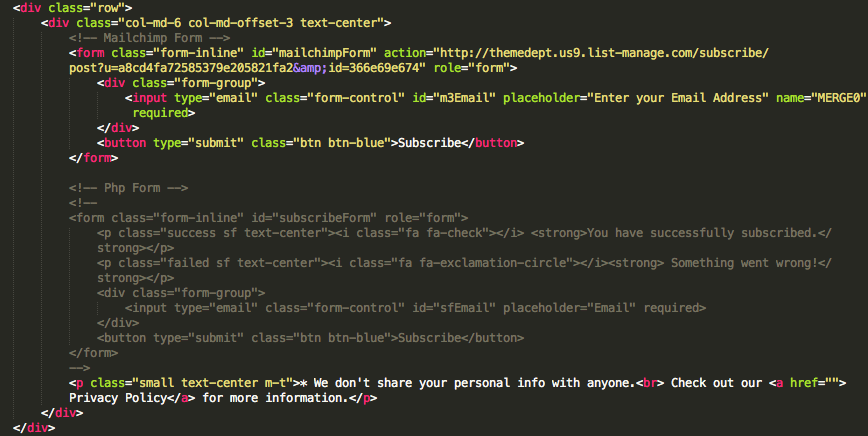
In order to use the respective subscription form you have to replace the mailchimp post url in the action attribute.
<form id="mailchimpForm" action="YOUR MAILCHIMP URL" role="form">
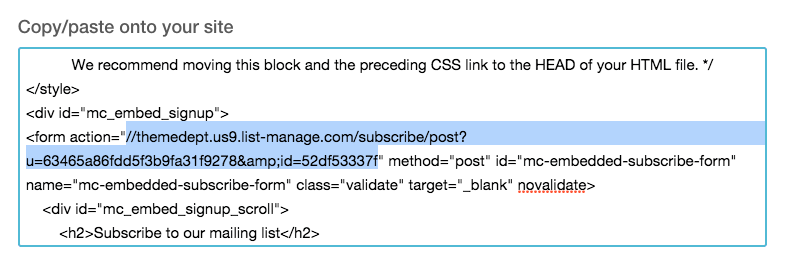
How to find the mailchimp post url?
- Login to your mailchimp account
- Go to your list
- Select Signup Forms
- Select Embedded forms
- Copy the link and paste into action attribute. (see image below)
Mail Contact Forms
iSEO24h provides 7 different contact forms with 7 different ids, as follow:
- #contactForm - standard contact form with 4 inputs: name, email, subject and message.
- #callbackForm - with 3 inputs: name, email and phone number.
- #ticketForm - with 4 inputs: name, email, phone number and ticket price fot the event.
- #quoteForm - used to request quote, with 4 inputs: name, email, phone number and message.
- #dateForm - used to request appointment, with 5 inputs: name, email, phone number, date picker and message.
- #subscribeForm - used in alternative to mailchimp subscription, with only the email input.
- #subscribeForm2 - used in alternative to mailchimp subscription, with 2 inputs: name and email.
Don't worry, no need to be familiar with PHP to edit this files. Just open the respective file (according to the id of the form) in the php folder and change the current email mail@iSEO24h.com with your email address. Your form is ready!.
// Email will be send
$to = "mail@iSEO24h.com";  // Change with your email address
Paypal Integration
PayPal is the most popular payment service on the web and iSEO24h provides the possibility to integrate your landing page with PayPal’s Instant Payment Notification Service (IPN) in order to process payments via "Buy Now" Button and "Subscription" Button(for recurring payments).
Once you have added the section of paypal preferred into the builder's canvas you can edit the values by using source button and following the indications commented.
How to edit the "PayPal Payments Standard" form?
<!-- Paypal PayNow Form -->
<form action="https://www.paypal.com/cgi-bin/webscr" method="post" target="_top" class="form-horizontal form-white form-paypal form-bg bg-grey">

<div class="form-group m-b-0">
    <button type="submit" name="submit" class="btn btn-shadow btn-green">GET YOUR TICKET</button>
    <img alt="" border="0" width="1" height="1" src="https://www.paypalobjects.com/en_US/i/scr/pixel.gif">
</div>

<!-- business = your PayPal ID or an email address associated with your PayPal account. -->
<input type="hidden" name="business" value="hi@iSEO24h.com">

<!-- cmd value determines which PayPal Payments Standard checkout experience you are using to obtain payment.
_xclick = "Buy Now Button"
_xclick-subscriptions = "Subscription Button"
_donations = "Donate Button" -->
<input type="hidden" name="cmd" value="_xclick">

<!-- currency_code = currency of the payment -->
<input type="hidden" name="currency_code" value="USD">

<!-- bn = id of the source that built the code for the button that the buyer clicked -->
<input type="hidden" name="bn" value="iSEO24hPaypal_BuyNow_WPS_IT">

<!-- item_name = description of item -->
<input type="hidden" name="item_name" value="iSEO24h_TICKET">

<!-- no_note =  do not prompt buyers to include a note with their payments -->
<input type="hidden" name="no_note" value="1">

<!-- amount = price of item -->
<input type="hidden" name="amount" value="199.00">

</form>
People who pay you through PayPal Payments Standard interact with HTML forms and hidden HTML input variables that you can see, edit and replace in the code of each paypal section.
Hidden Input Variables
This HTML input variables are hidden from the payer's view. They have the following general format:
<input type="hidden" name="variableName" value="allowedValue">
The variableName is any of the variables described in "HTML Variables for PayPal Payments Standard" and the allowedValue is any of the values detailed for those variables.
Here's a run down of the fields you'll be interested in changing:
-
Business
This field is for the PayPal account being paid to. Make sure it's set to your account. Replace hi@iSEO24h.com with your email. -
Currency Code
The currency of the payment. For allowable values, see Currencies Supported by PayPal. -
Item Name
The item_name field is the name associated with item, the one that describes what your user are paying for. -
Amount
The price or amount of the product, service, or contribution, not including shipping, handling, or tax.
How to edit multiple price fields
iSEO24h provides paypal form with multiple prices that let your users the possibility to choose between two or more options. This type of form includes:
- a select (with name os0) where the value of each option is the name of the plan.
<select class="form-control" name="os0" required>
    <option value="">Choose Ticket</option>
    <option value="Basic">Basic $199,00 USD</option>
    <option value="Premium">Premium $299,00 USD</option>
    <option value="Gold">Gold $499,00 USD</option>
</select>
- hidden variables depending on how many are the options of choice. each option must have a option-select variable (which ends with the corresponding number of the option - starting at 0) with value the name, and a option_amount variable (which also ends with the corresponding number of the option) with value the price of option.
<!-- value and amount of options -->
<input type="hidden" name="option_select0" value="Basic">
<input type="hidden" name="option_amount0" value="199.00">
<input type="hidden" name="option_select1" value="Premium">
<input type="hidden" name="option_amount1" value="299.00">
<input type="hidden" name="option_select2" value="Gold">
<input type="hidden" name="option_amount2" value="499.00">
How to edit quantity fields
Quantity field includes also a "select" (with name quantity) where the value of each option is the amount of the quantity:
<select class="form-control" name="quantity" required>
    <option value="">Choose Quantity</option>
    <option value="1">1 Ticket</option>
    <option value="2">2 Tickets</option>
    <option value="3">3 Tickets</option>
</select>
How to edit Subscription Form
Subscribe buttons are used to obtain subscription payments automatically from buyers for access to online content and services or for regular delivery of goods.
<form action="https://www.paypal.com/cgi-bin/webscr" method="post" target="_top">

<button type="submit" name="submit" class="btn btn-ghost">Subscribe Now</button>
<img alt="" border="0" width="1" height="1" src="https://www.paypalobjects.com/en_US/i/scr/pixel.gif">

<!-- business = your PayPal ID or an email address associated with your PayPal account. -->
<input type="hidden" name="business" value="hi@iSEO24h.com">

<!-- cmd value determines which PayPal Payments Standard checkout experience you are using to obtain payment.
_xclick = "Buy Now Button"
_xclick-subscriptions = "Subscription Button"
_donations = "Donate Button" -->
<input type="hidden" name="cmd" value="_xclick-subscriptions">

<!-- currency_code = currency of the payment -->
<input type="hidden" name="currency_code" value="USD">

<!-- item_name = description of item -->
<input type="hidden" name="item_name" value="iSEO24h_BUSINESS_PLAN">

<!-- a3 = amount to billed each recurrence -->
<input type="hidden" name="a3" value="5.46">

<!-- t3 = time period (D=days, W=weeks, M=months, Y=years) -->
<input type="hidden" name="t3" value="M">

<!-- p3 = subscription duration. Specify an integer value in the allowable range for the units of duration that you specify with t3 -->
<input type="hidden" name="p3" value="1">

<!-- src = recurring payments.
src = 0 - subscription payments do not recur
src = 1 - subscription payments recur
-->
<input type="hidden" name="src" value="1">

<!-- sra = reattempt on failure. If a recurring payment fails, PayPal attempts to collect the payment two more times before canceling the subscription.
sra = 0 – do not reattempt failed recurring payments
sra = 1 – reattempt failed recurring payments before canceling
-->
<input type="hidden" name="sra" value="1">

<!-- no_note =  do not prompt buyers to include a note with their payments -->
<input type="hidden" name="no_note" value="1">

</form>
in this kind of forms the hidden variables to be edited, in addition to those already mentioned, are:
- a3 - the regular subscription price
- t3 - the regular subscription units of duration. allowable values are: D for days, W for weeks, M for months, Y for year
- p3 - subscription duration. Specify an integer value in the allowable range for the units of duration that you specify with t3
- src - recurring payments. Subscription payments recur unless subscribers cancel their subscriptions before the end of the current billing cycle. Allowable values are: 0 — subscription payments do not recur and 1 — subscription payments recur
- sra - Reattempt on failure. If a recurring payment fails, PayPal attempts to collect the payment two more times before canceling the subscription. Allowable values are: 0 — do not reattempt failed recurring payments and 1 — reattempt failed recurring payments before canceling
if you want to implement a subscription button with different characteristics, you can use the samples that provides the paypal developer site: Sample Html Code for Subscribe Buttons
How to enable IPN and notification emails
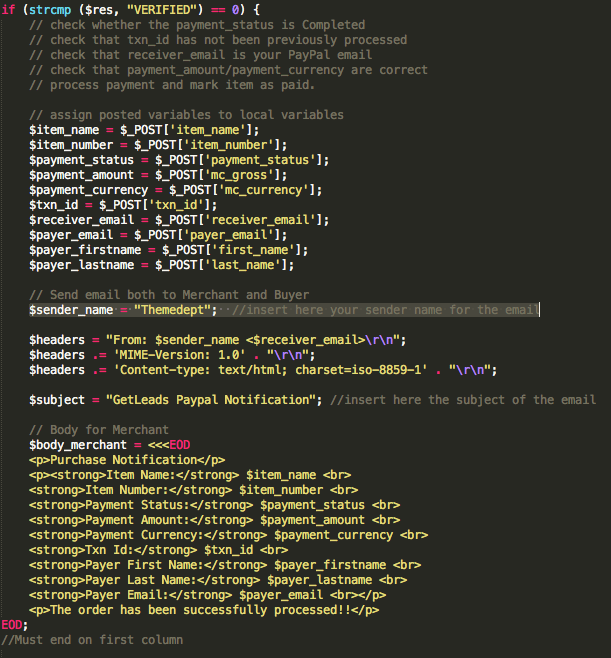
IPN (Instant Payment Notification) is a POST message sent by Paypal (for regular merchant accounts) whenever a transaction is completed on their side. This message contains all the data regarding the payment transaction completed by a form user. You can use IPN messages to automate back-office and administrative functions, such as fulfilling orders, tracking customers, or providing status and other transaction-related information.
In iSEO24h we use IPN to send a confirmation email to seller and to buyer with the order details. You can edit these emails in the file php/paypal_ipn.php that you can find in the exported folder for "buynow" forms and in the file php/paypal_ipn_subscription.php for "subscription" forms. The only value that needs to be changed is the sender_name that must be replaced (see image below).
How to test IPN Message
The IPN simulator is a tool that can be used to send test IPN messages from the PayPal Sandbox to the URL at which your listener is running
A basic requirements when using the IPN Simulator is that you must be logged into the PayPal Developer site and your IPN listener must be implemented and running on your web server. So you can use the Ipn Simulator only after uploading the exported folder to your website. You can find your Ipn Listener in https://www.yourdomain.com/php/paypal_ipn.php or if you use a subdirectory in https://www.yourdomain.com/yoursubdirectory/php/paypal_ipn.php.
To use the IPN simulator, follow these steps:
1- Go to the PayPal Developer site and log in.
2- Click Dashboard at the top of the page.
The dashboard tools are displayed on the left side of the page.
3- Select IPN simulator.
4- In the IPN handler URL text box, enter the URL of the listener to which you want to send a test IPN notification message (https://www.yourdomain.com/php/paypal_ipn.php).
5- From the Transaction type dropdown menu, select the type of transaction for which you want to send an IPN message. For example you can choose "eCheck - complete".
This simulator opens an input form for the specified IPN message, with most fields populated with test data. In the receiver_email insert your email address
6- Click Send IPN at the bottom of the form.
The simulator sends a single copy of the specified IPN message to the specified listener and displays the results at the top of the page.
Setting Up IPN Notifications on PayPal
The following procedure describes how to specify and activate the URL for your IPN listener (php/paypal_ipn.php) in your PayPal profile. Your listener must be located at the URL that you specify in the profile. Before you activate your listener on PayPal, you should test the listener using the IPN simulator in the Sandbox. After that, when you're ready to go online, the first thing to do is to replace in php/paypal_ipn.php line 12 with:
define("USE_SANDBOX", 0);
then follow these instructions to set up your listener:
1- Log in to your PayPal business account at www.paypal.com. You need a Business Account to set up IPN.
2- Click the profile icon on the top right side of the page. From the Business Profile menu, select Profile and Settings, then select My selling tools.
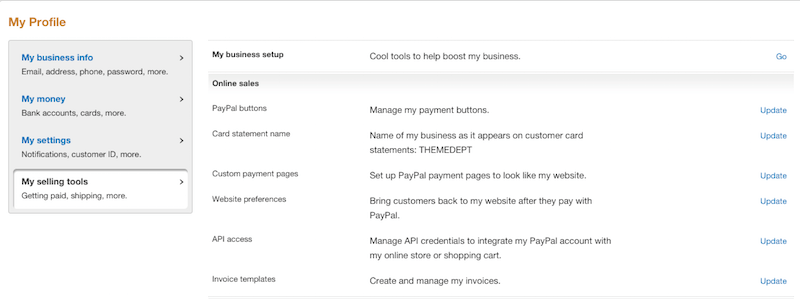
3- Click the Update link in the Instant payment notifications row, in the Payments and risk management section.

4- Click Choose IPN Settings to specify your listener's URL and activate the listener. The following page opens:
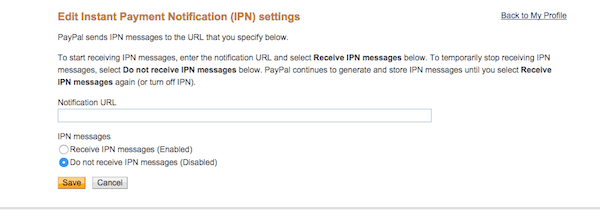
5- Specify the URL for your listener in the Notification URL field. (https://www.yourdomain.com/php/paypal_ipn.php).
6- Click Receive IPN messages (Enabled) to enable your listener
7- Click Save.
That's all. Every time a transaction is completed, it will be sent a confirmation email both to you and to your customer. To know more, you can read these articles on paypal developer site:
Introducing IPN
Instant Payment Notification
How to secure your payments via IPN?
Paypal always recommend to use the Button Creation tool to create all your payment buttons. And in case you want to create your payment buttons manually Paypal suggest to use EWP to Protect Manually Created Payment Buttons.
In addition, another security measure could be to check for possible fraud directly via IPN if a user acts maliciously on your form by changing the values of your payment.
For example, if the payment consists in sending a digital file, after that the payment has been validated via IPN and before sending the file to your consumer you should check if the amount of the payment, the currency used and the email of your business profile are correct by uncommenting and editing according to your needs these lines of code in your paypal_ipn.php
/* --------------------------------------------
    Example code to check fraud

    $errmsg = '';

    // Make sure seller email matches your primary account email.
    if ($receiver_email != 'youraccount@mail.com') {
        $errmsg .= "'receiver_email' does not match.";
    }

    // Make sure the amount(s) paid match. in the example below, payment amount should be 19.00
    if ($payment_amount != '19.00') {
        $errmsg .= "'mc_gross' does not match.";
    }

    // Make sure the currency code matches
    if ($payment_currency != 'USD') {
        $errmsg .= "'mc_currency' does not match.";
    }

    if (!empty($errmsg)) {

        // manually investigate errors from the fraud checking
        $body_error = <<<EOD
        <p>IPN failed fraud checks:</p>
        <p>$errmsg</p>
        <p>from buyer: $payer_email</p>
EOD;
//Must end on first column

        $headers = "From: Fraud Notification System <$receiver_email>\r\n";
        $headers .= 'MIME-Version: 1.0' . "\r\n";
        $headers .= 'Content-type: text/html; charset=iso-8859-1' . "\r\n";

        $subject = "iSEO24h Fraud Notification"; //insert here the subject of the email

        // PHP email sender
        mail('youraccount@mail.com', $subject, $body_error, $headers);

        if(DEBUG == true) {
            error_log(date('[Y-m-d H:i e] '). "Fraud Notification: $errmsg ". PHP_EOL, 3, LOG_FILE);
        }

    }
In the example above the script sends an email to your business account each time that the parameters doesn't match so you can manually check the transaction and contact the user involved.
Support
We truly appreciate that you've chosen iSEO24h. Customer satisfaction is our priority and we understand that sometimes you need help. We provide friendly and helpful support so don't hesitate to ask!
- Support Email: iSEO24hAgent@gmail.com