
Creating customer groups and putting customers into those groups is the work that you need to do before you can send process the SMS campaigns from your phone.
The content of this article includes:
+ How to create a group customer?
+ How to edit or delete a group customer?
+ How to input your customers into those groups manully?
+ How to input your customers into those groups from Excel file?
+ How to edit or delete a customer?
To do it, so You need to login into SmsMk365.com, you can read the article bellow to know more about that: Register an account and login into SmsMk365.com;
+ To create a group customer, you click on CONTACTS (1) menu => GROUPS (2) menu => ADD GROUP (3) button. You do it like Figure 1 bellows:
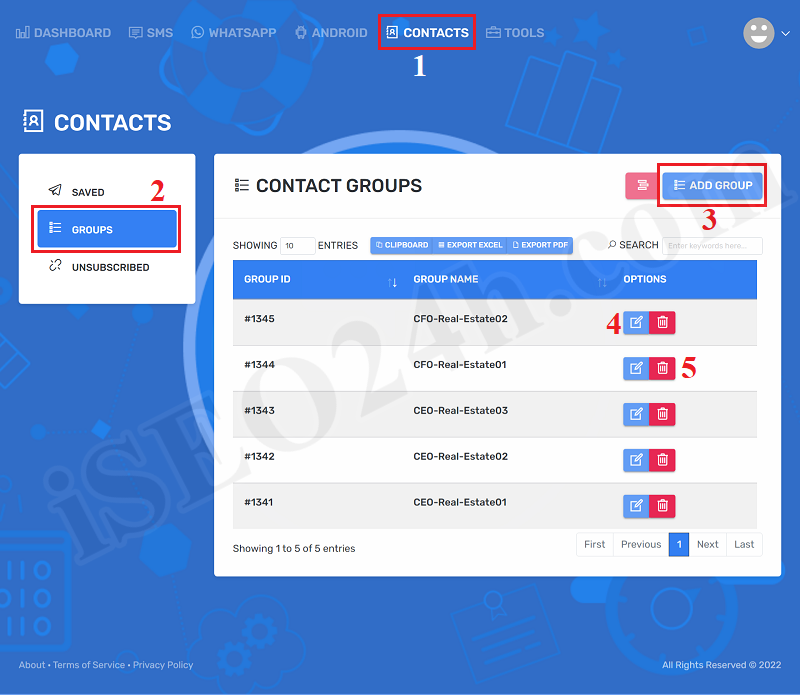
Figure 1: Prepare to create a group customer
+ In new window, you need input name of group that you want to create into 6th box like Figure 2 bellows. Final, you click SUBMIT (7) button to finish.

Figure 2: Add a group customer
+ To edit a group customer, you can click on 4th icon like Figure 1 that you want to edit, then you should modify the information of that group.
+ To delete a group customer, you can click on 5th icon like Figure 1 that you want to delete.
+ To create a customer (contact) and input it into the suitable group, you need click on CONTACTS (8) menu => SAVED (9) menu => you click on ADD CONTACT (10) button. Please do it like Figure 3 bellows.

Figure 3: Prepare to create a customer/contact manual
.png)
Figure 4: Add a customer/contact manual
In Add Contact Form, you need input data of contact/customer into all box of that form.
+ NAME (14): You input contact name here.
+ PHONE NUMBER (15): You input contact number here. PHONE NUMBER should begin with plus and your country's international telephone area code, Next is the customer's phone number (For example: +840945068598). You can find your country's international telephone area code HERE.
+ CONTACT GROUP (16): You choose the group that contact need input there.
=> Final, you click on SUBMIT (17) button to finish;
+ To create a customer (contact) and input it into the suitable group, you need click on CONTACTS (8) menu => SAVED (9) menu => you click on IMPORT (11) button. Please do it like Figure 3 above.
+ Next, you need click on 18th link to download template of excel file like Figure 5 bellows. And then you copy data of contacts follows the structure of this file.
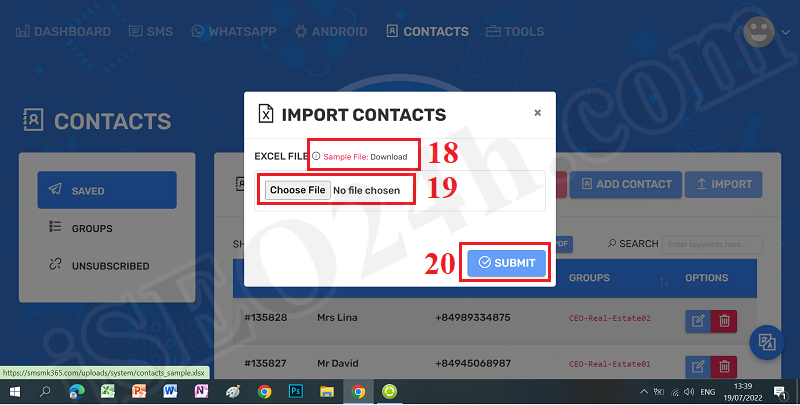
Figure 5: Import contacts from Excel file
+ Next, when you organize the data for the excel file, so you should click on Choose file (19) button to upload this file, final you click on SUBMIT (20) button to finish import data.
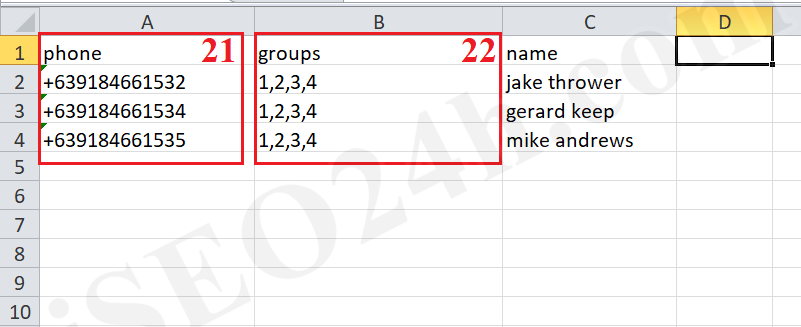
Figure 6: Structure of excel file
*Notes:
- 21th Area: you need input contact number for this colunm. Contact number should begin with plus and your country's international telephone area code, Next is the customer's phone number (For example: +840945068598). You can find your country's international telephone area code HERE.
- 22th Area: you need input Group ID here. You can find it at Group ID column in Figure 1 above. It can be only one group id or more group ids. but it has more group ids so they should be separated by commas.
+ To edit one contact, in list of contacts like Figure 3 above, you need click on 12th icon, and then you modify the contact's infomation.
+ To delete one contact, you need click on 13th icon to delete it.
* Note: If you have any questions about this platform, so you can contact us via email iSEO24hAgent@gmail.com to get our support as soon as!


.png)
