
In today's digital landscape, email marketing stands as a crucial tool for engaging with your audience. Whether you're a small business owner, marketer, or entrepreneur, the ability to send bulk emails efficiently can significantly enhance your marketing efforts. However, investing in expensive email marketing software isn't always an option, especially for those just starting out. Fortunately, there are free bulk email software solutions available that can help you manage and execute your email campaigns without incurring high costs.
This guide will provide you with an in-depth look at the best free bulk email software options and detailed instructions on how to use them effectively to maximize your marketing impact.
CONTENT
1. What is mass mailing software?
2. Benefits that mass mailing software brings to individuals and businesses
3. How to use mass mailing software?
3.1. Download, install and activate the software license for free
3.2. Setup SMTP Server to send bulk mails
3.4. Organize content and options for mass mailing campaigns
3.5. Execute mass email campaigns
3.6. Other functions of the software
3.7. Video instructions for using the full software
4. Notes when using mass mailing software
5. How to upgrade the software to the advanced version?
6. Contact to answer questions
DETAILS
Mass mailing software, also known as bulk email software, is a tool designed to send a large volume of emails to multiple recipients at once. This software is commonly used in email marketing campaigns to distribute newsletters, promotional offers, announcements, and other types of mass communication. Here are some key features and functions of mass mailing software - UTPSendBulkMailerPro:
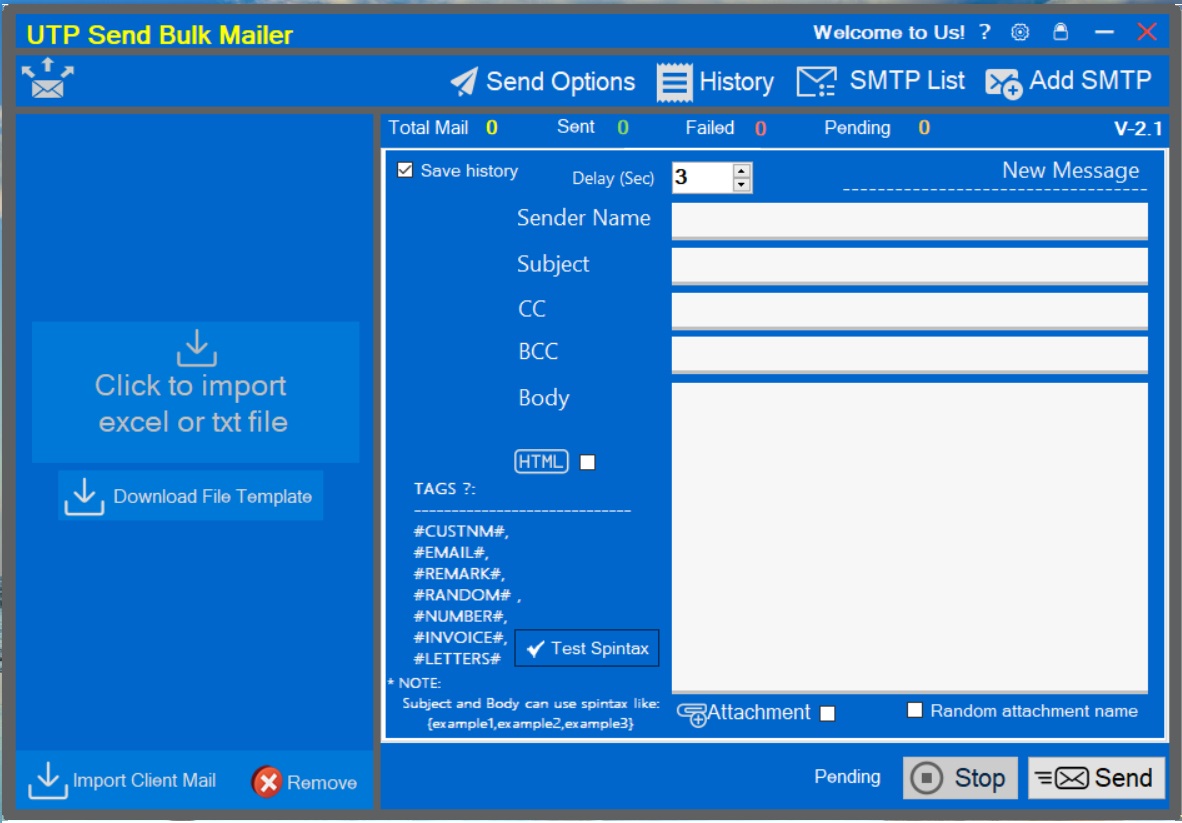
Picture 01: Main interface of Send Bulk Email Software
Email List Management: Allows users to import, organize, and manage email lists, ensuring that emails are sent to the correct recipients. Import emails from excel or txt file.
Personalization: Enables the inclusion of personalized elements such as the recipient’s name, which can improve engagement rates.
SMTP mail server: Create unlimited mail servers from free SMTP service providers such as Google, Yahoo. Or paid SMTP service providers such as: Mailgun, Sendgrid, SparkPost, Elastic Email, Maildocker, SendPulse, SendinBlue, MailJet, Pepipost, Postmark...
Body mail content type: Supports plain text and HTML mail content types.
Spintax and Tags support: You can easily apply Spintax syntax and Tags such as: #CUSTNM#, #EMAIL#, #REMARK#, #INVOICE#, #NUMBER#, #LETTERS#... to header content Email subject and email body content. Thus, you can completely attach the customer's name to the email subject, as well as in the email body. Using Spintax will help create content that is unique to each customer. This increases the rate of mail reaching the inbox.
Email Templates: Allows you to save email templates for future mass mailing campaigns without having to waste time redesigning them.
Attached files: Supports sending mass mail with attached files. The attachment is renamed each time it is sent to a specific customer.
Automation: Supports automated email sequences, such as welcome emails, follow-up emails, and drip campaigns, which can be triggered based on user actions or predefined schedules.
Compliance: Ensures adherence to email marketing regulations, such as CAN-SPAM in the United States or GDPR in Europe, by providing features like easy unsubscribe options and consent management.
Independent working mode: The software works independently and does not affect other applications on PC or Laptop. You just need to set up a mass mailing campaign and leave it to the software to do it itself. You just need to focus on doing other work.
Send mass mail safely: with the support of delay, spintax, tags functions, the software helps your mail be sent in bulk with a mail inbox rate of over 95% when you follow the instructions in this article. and comply with email marketing knowledge.
Simple interface, easy to use.
Mass mailing software is a valuable asset for businesses and organizations aiming to maintain regular communication with their audience, drive engagement, and boost sales through email marketing campaigns.
Mass mailing software offers numerous benefits to individuals and businesses, enhancing their communication strategies and marketing efforts. Here are some key advantages:
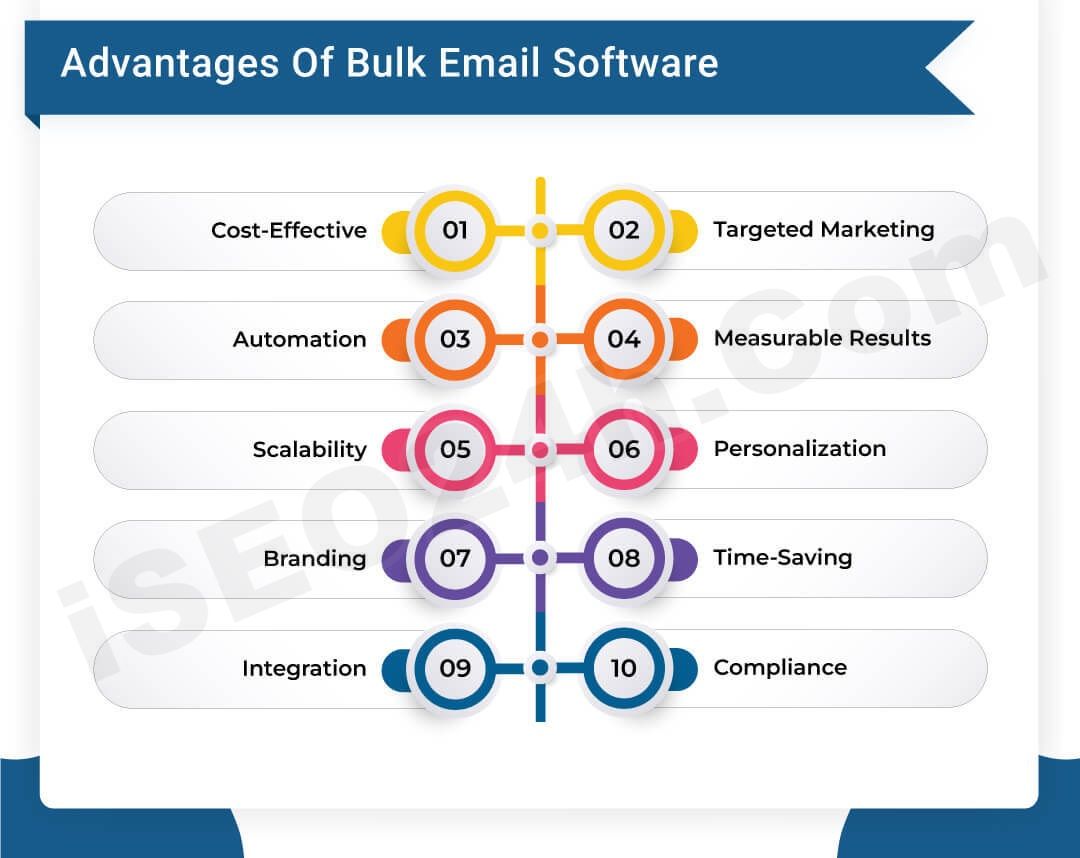
Picture 02: Benefits that mass mailing software
Time Efficiency: With automated features, individuals can schedule emails in advance, reducing the time spent on manual sending and allowing for more efficient use of time.
Personalization: The software enables personalization of emails, making communications more relevant and engaging for the recipients. Personalized emails can include the recipient's name, preferences, and other customized content.
Tracking and Analytics: Individuals can track the performance of their emails, such as open rates and click-through rates, providing valuable insights into the effectiveness of their communication efforts.
Professional Appearance: Built-in templates and design tools help individuals create professional-looking emails without needing extensive design skills.
Scalability: Businesses can reach a large number of potential and existing customers simultaneously, scaling their marketing efforts without significant additional costs.
Automation: Automated email sequences, such as welcome emails, follow-ups, and drip campaigns, save time and ensure consistent communication with leads and customers.
Enhanced Engagement: Personalized and targeted emails can increase engagement rates, leading to higher open and click-through rates, and ultimately, better conversion rates.
Brand Consistency: Consistent email templates and branding elements ensure that all communications align with the business’s brand identity, strengthening brand recognition and trust.
Segmentation: Businesses can segment their email lists based on various criteria such as demographics, purchase history, and behavior, allowing for more targeted and effective marketing campaigns.
Analytics and Insights: Detailed analytics and reporting features help businesses track the success of their campaigns, understand customer behavior, and make data-driven decisions to improve future campaigns.
Compliance: Features ensuring compliance with email marketing regulations (such as easy unsubscribe options and consent management) help businesses avoid legal issues and maintain a positive reputation.
Customer Retention: Regular communication with customers through email helps businesses build and maintain strong relationships, fostering loyalty and encouraging repeat business.
Lead Nurturing: Automated follow-up emails and personalized content can nurture leads through the sales funnel, increasing the likelihood of conversion.
Revenue Generation: Effective email marketing campaigns can drive traffic to a business’s website, increase sales, and ultimately boost revenue.
In summary, mass mailing software provides a powerful tool for both individuals and businesses, enhancing their ability to communicate effectively, engage with their audience, and achieve their marketing goals efficiently and cost-effectively.
+ First step, you should download the mass mailling software from this link:
https://drive.google.com/file/d/1dkCjQSR5H1qLstWVZ5KuCm0B39qRYmgV/
+ Second step, you unzip your file that you have just downloaded. It has name that is UTPSendBulkMailerPro-Installer.zar;
+ Third steps, you go to UTPSendBulkMailerPro-Installer folder => and you unzip UTPSendBulkMailerPro-Installer-V21.zar (with password to unzip which is iSEO24h.Com);
+ 4th step, you go to UTPSendBulkMailerPro-Installer-V21 folder => and you click on UTPSendBulkMailerPro.smi to install this software.
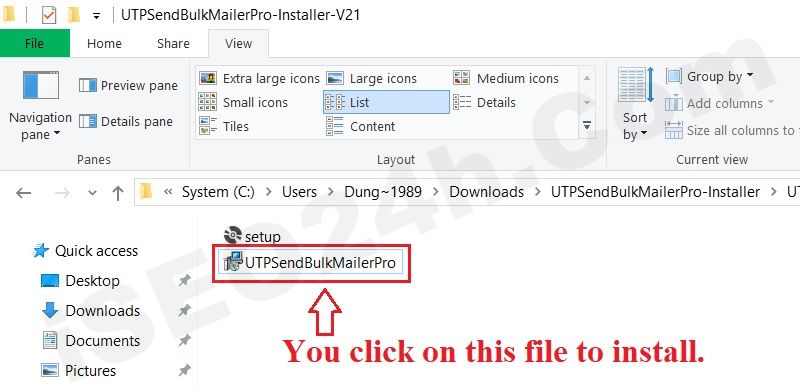 Picture 03: Click on UTPSendBulkMailerPro to install this software
3.1.2. Activate the use of free software copyright
Now you click on UTPSendBulkMailerPro icon of this software on your desktop, then one window show like the picture bellows:
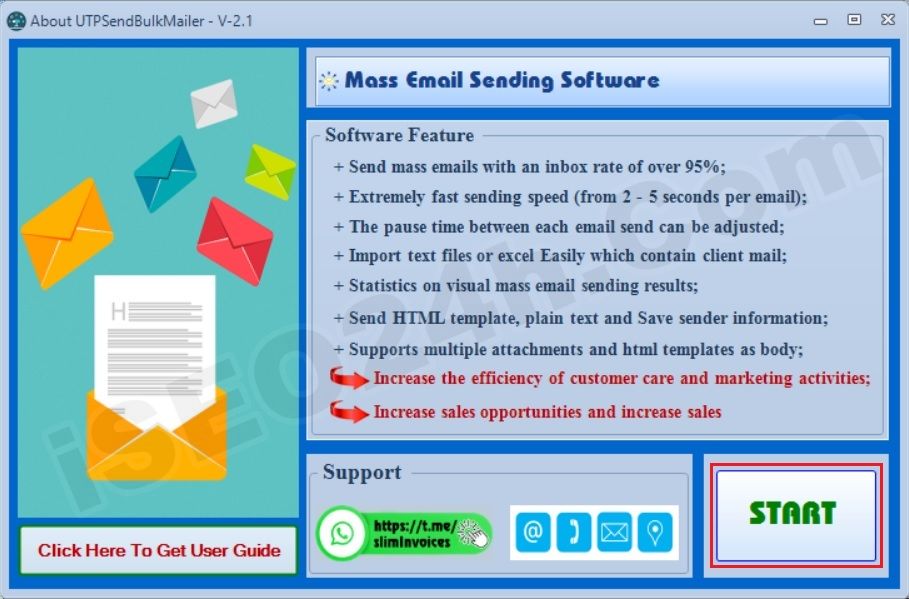
Picture 04: The main interface of the send bulk email software
Now, you click on START button to continues, then a new window show like the picture bellows:
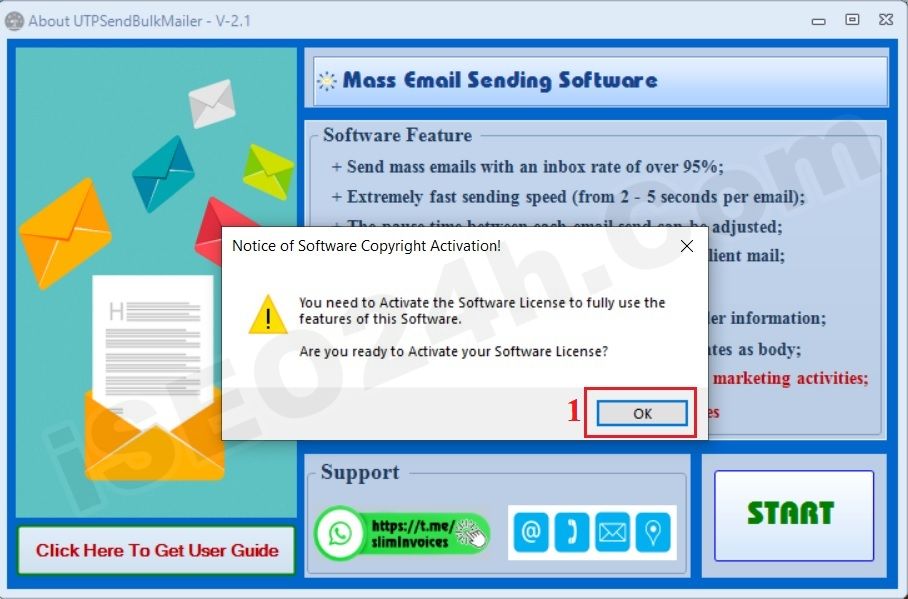
Picture 05: The software notifies you to activate the software license
In that window, you click on OK button to continues, after that the Active Software Copyright window shows like the picture bellows:

Picture 06: Software license activation window interface
Now you copy the Activation Code in the Box above and send it to the Supplier according to the information belows: Email: iSEO24hAgent@gmail.com or Telegram: https://t.me/slimInvoices to get the Activation Key Code to active your software.
One you have Activation Key Code from the supplier, so you can delete all text in Activation Key Code box then you paste the Activation Key Code there => Final, you click on ACTIVATE buton. If the Activation Key Code is right so your software is actived.
Now you can use this software.
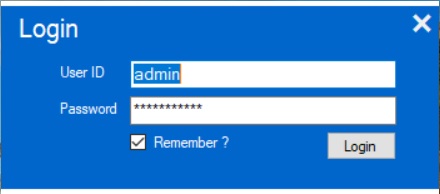
Picture 07: The login interface of the bulk send mail software
In the above login, in UserID box, you input admin. In Password box, you input iSEO24h.Com => Final, you click on Login button to login into this software.
Picture 08: Main interface of Send Bulk Email Software after you login successfully
To setup the smtp server to send bulk mails, you can use the free smtp suppliers like: Google mail, Yahoo mail. Beside, You can use paid smtp service providers like: Mailgun, Sendgrid, SparkPost, Elastic Email, Maildocker, SendPulse, SendinBlue, MailJet, Pepipost, Postmark...
In this userguide, I'm using Google mail to setup the smtp server to send bulk mails. To setup the smtp server, you should process follow some steps:
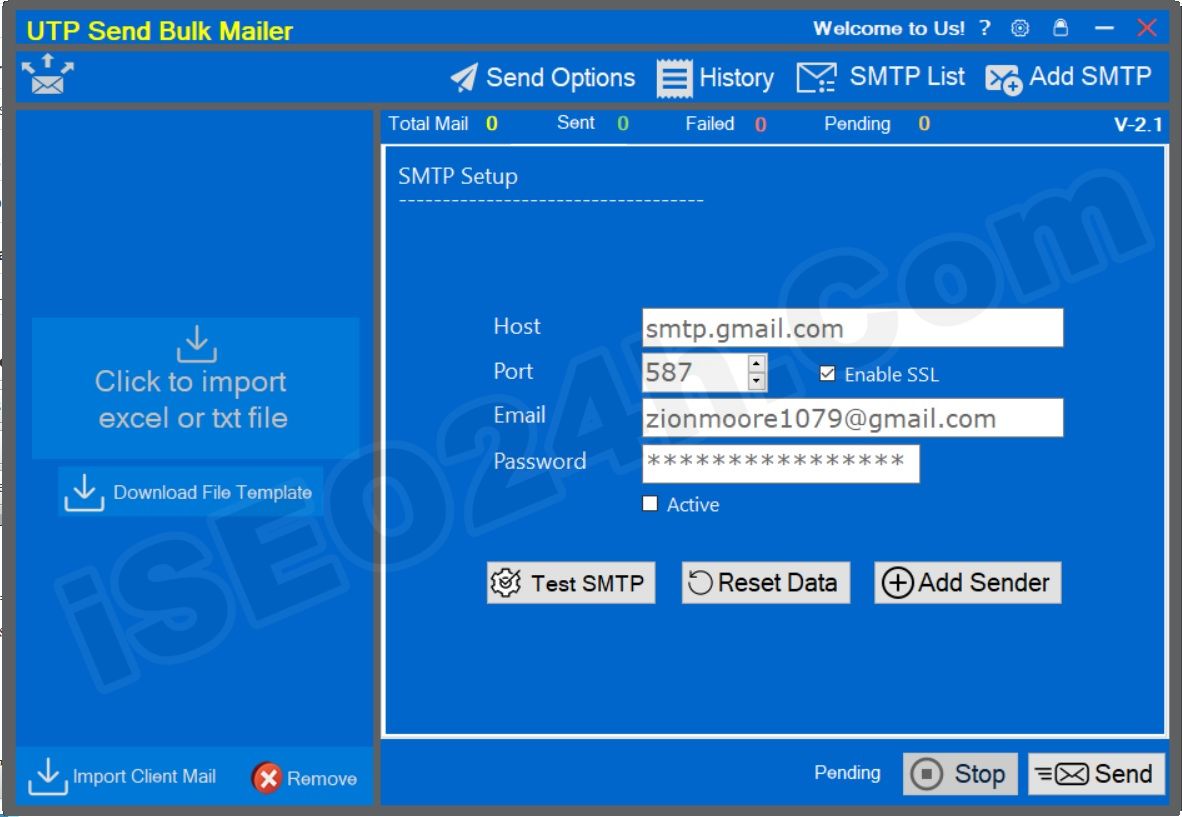
You click on Add SMTP button to open SMTP Setup window => then you input all things via this window like picture bellows:
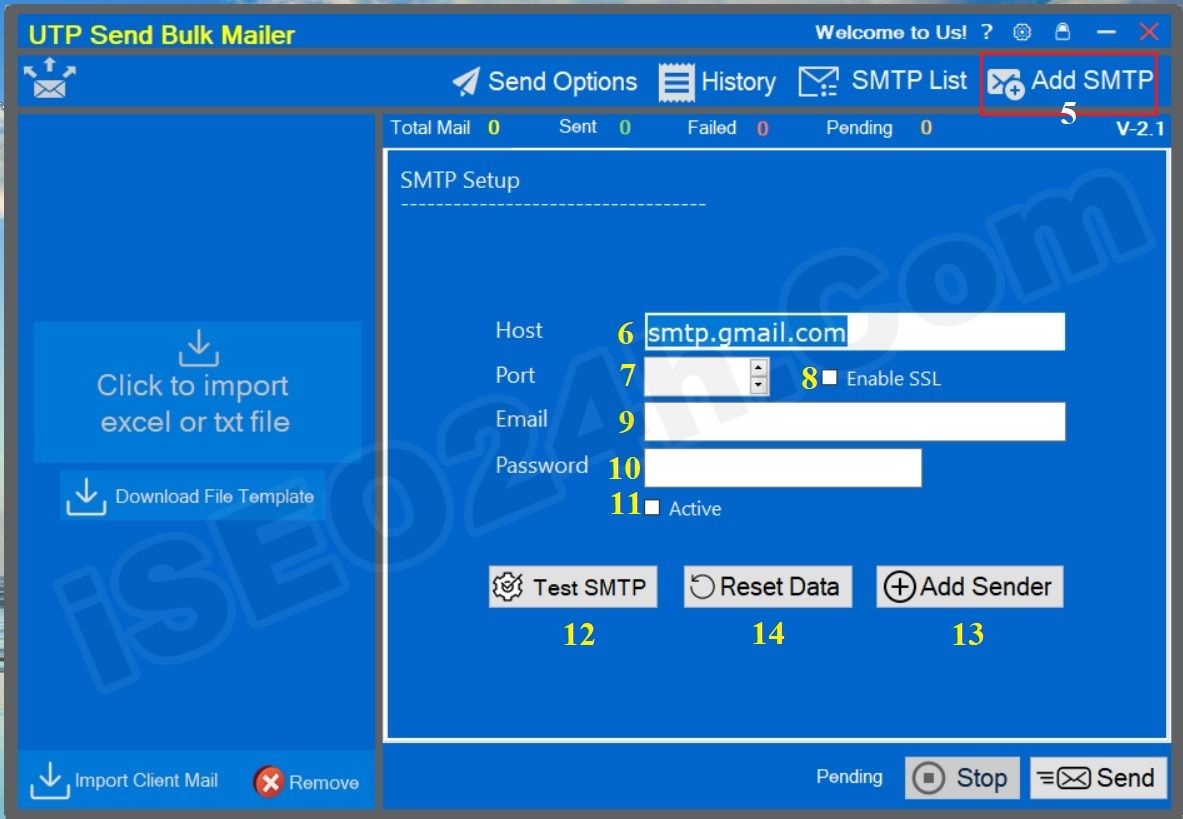
Picture 09: Setup SMTP server
* Notes:
+ Host (6) box: You input your email that you want use it to send bulk mails to your clients. With gmail, you input: smtp.gmail.com
+ Port (7) box: You input port of smtp server. With gmail, you input: 587.
+ Enable SSL (8) option: You click to tick it (with gmail).
+ Email (9) box: You input your email that you want use it to send bulk mails for your clients.
+ Password (9) box: You input the Application password that's suitable with your email that you input in Email (9) box above. You can follow the userguide bellows to generator this application password.
+ Active (10) option: You click to tick it;
+ First, you open your browse like chrome, and You access your gmail address that you input in Email (9) box above.
+ Second, you access to this address: https://account.google.com/ to turn on the 2 layer security for your email.
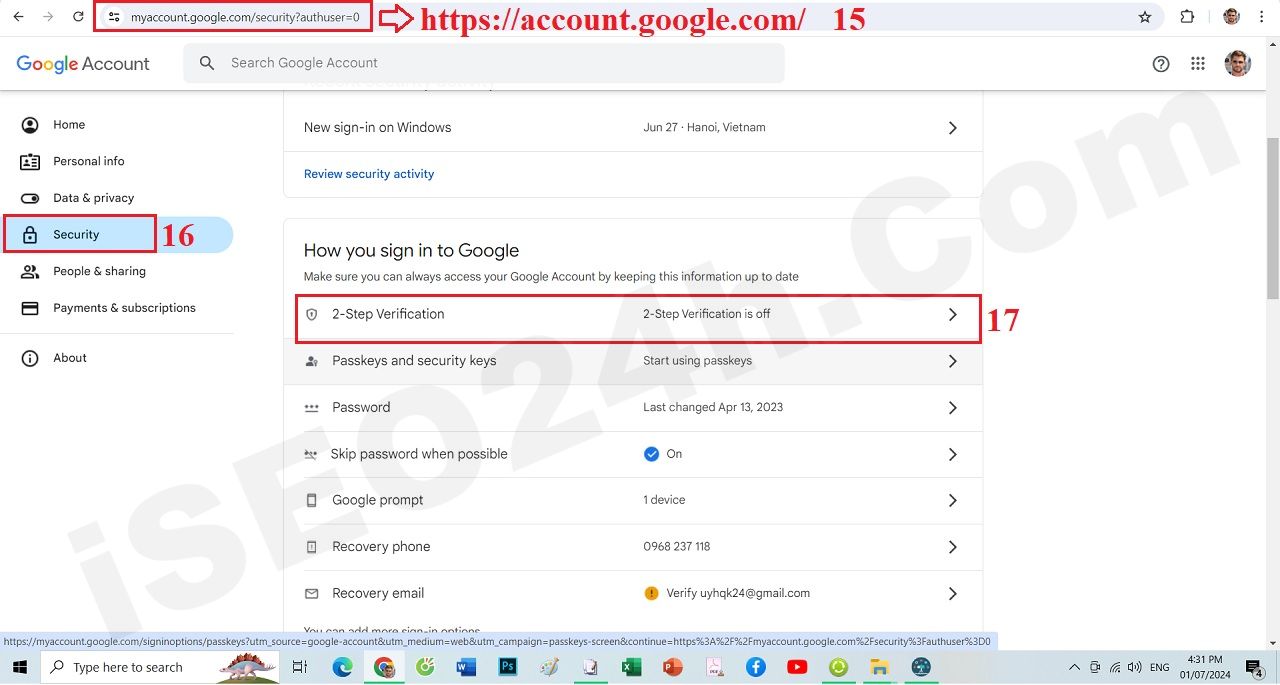
Picture 10: Turn On the 2 layer security for your gmail account

Picture 11: Turn On the 2 layer security for your gmail account - continues
=> Next, you make a google authentication request to enable two-factor password. When you finish, you can see its status like picture bellows:

Picture 12: Results of enabling two-layer password
+ Third, You can create a two-factor password for your gmail address by clicking on the following link: https://myaccount.google.com/apppasswords.
(You can do it like: Open your chrome with link: https://account.google.com/ => click on Security menu => 2 step Verrification => Application Password)
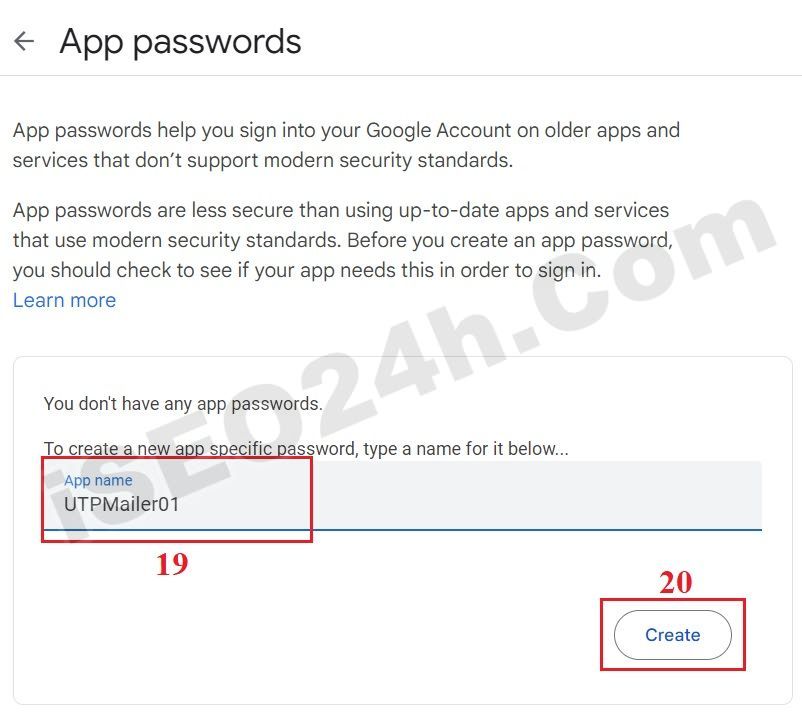
Picture 13: Generator the application password
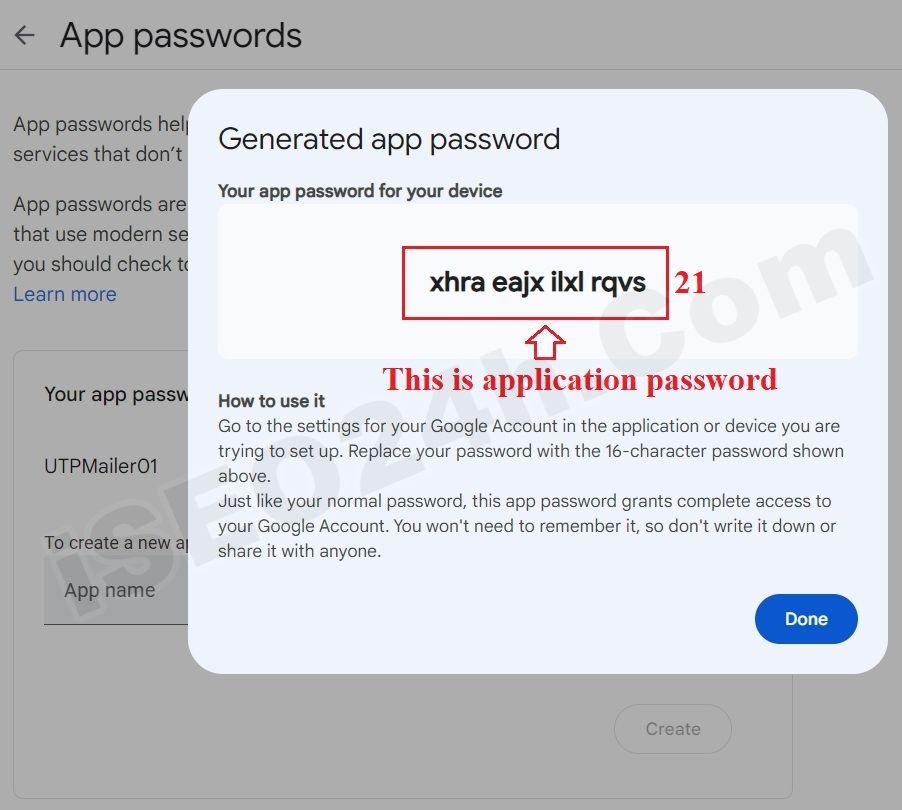 Picture 14: Result of generator the application password
=> Now you can copy the application password like 21 red box in picture 14 and you paste it into Password (10) box in your software like picture 09 above. But you have to remove all spaces in your application password before you paste it into Password (10) box.
Picture 15: Interface of smtp mail server setup results
Now you should click on Test SMTP button to test all your things that you have just inputed into this window. If it's ok so you click on Add Sender to finish the setup smtp server to send bulk mails.
If it's wrong so you have to check all things in the SMTP Setup window the you try it againt.
Picture 16: Interface of SMTP List
This is a very important step in a mass mailing campaign. To organize customer data, click the Download File Template (24) button (like picture 17 bellows) to download the customer data organization file template to your computer. Then, you delete the old data and replace the customer data you want to send mass mail to in that sample excel file or txt file.
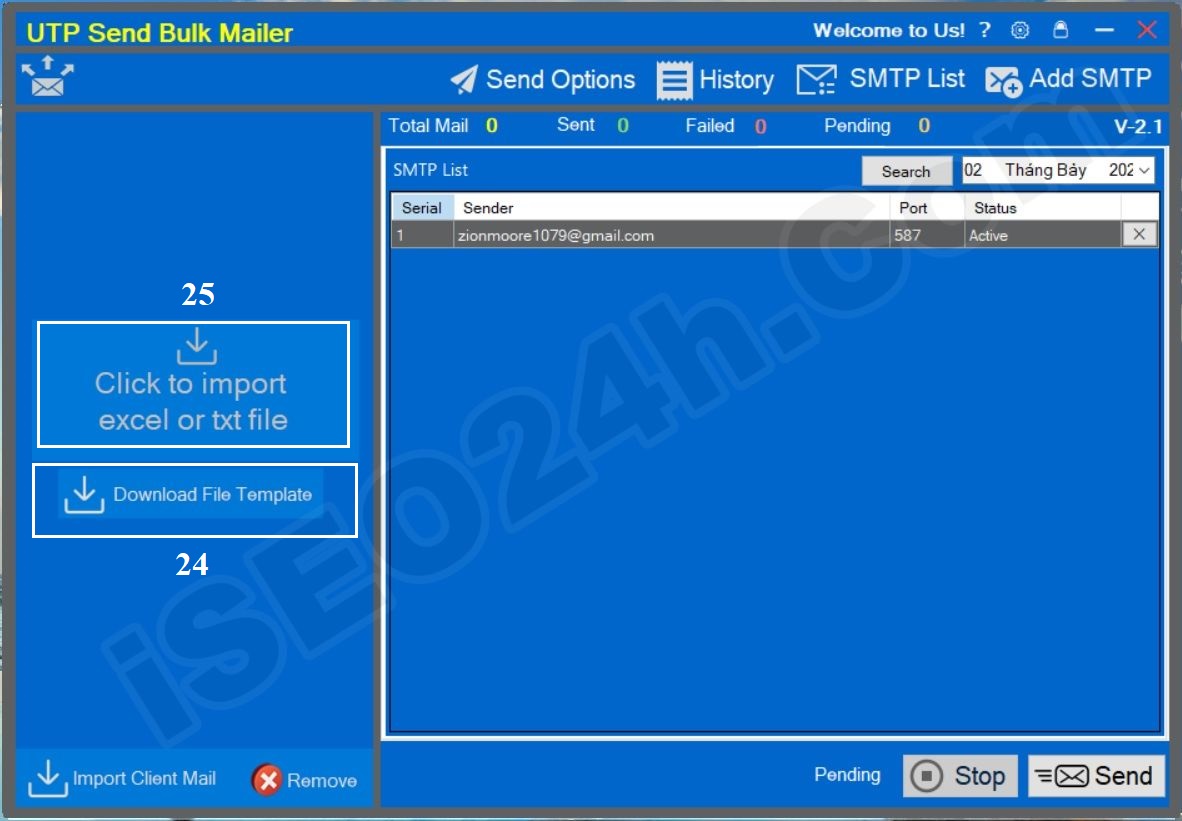
Picture 17: Organize customer data
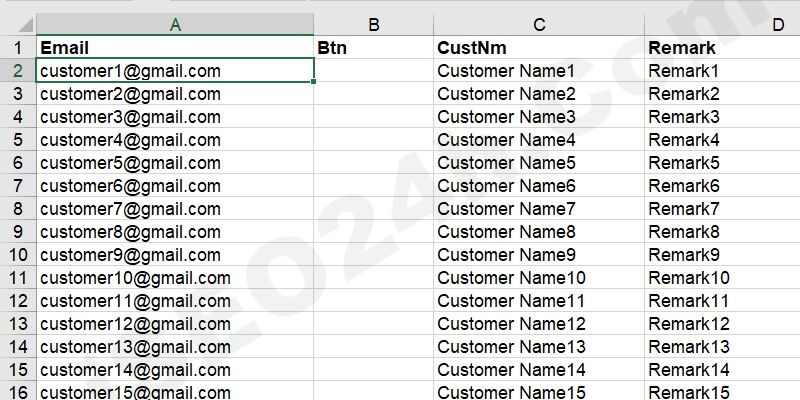
Picture 18: Sample file for organizing customer data
* Notes:
- Email column: You input your client email there.
- Btn column: It's blank.
- CustNm column: You input your Client Name there.
- Remark column: You enter additional information for customers such as: Pay slip information, professional test score information, price list information, sales policy information, or you can leave it blank, etc.
=> After you have organized the customer data you need to email on that sample excel file, go back to the software and click the Click to import excel or txt file (25th - like picture 17th above) button to import data in bulk from the excel or txt file you created. Organize as instructed above.

Picture 19: Results after importing customer data into the software
* Notes:
+ Remove button: You click this button to delete all data clients;
+ Import Client Mail button: You click on this button to import new data of clients.
To do it, you click on Send Options (26) button, so Send Options window's showing like picture 20th bellows:
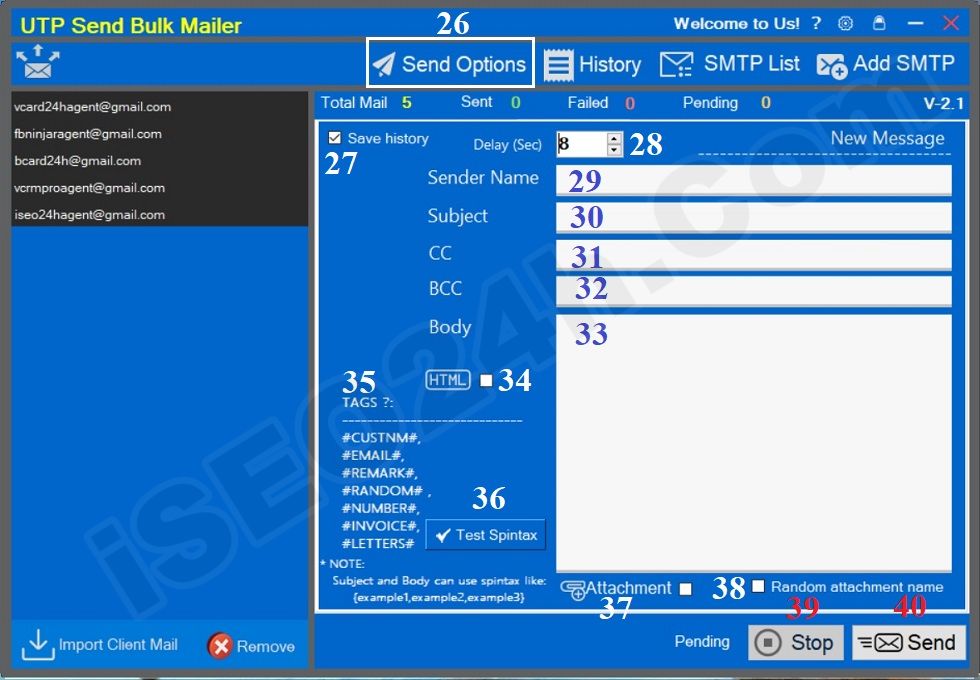
Picture 20: Organize content and options for mass mailing campaigns
* Notes:
+ Save History (27) Option: If you want to save all options in this window to database so you can check to tick it. This data of history's showing when you click on History button. This data can be used for send bulk mails campaign in the next time.
+ Delay (Sec) (28) box: The default value of this box is 3 seconds. If you leave this value unchanged, after sending the email, the software will stop for 3 seconds before sending the next email. If this box receives a value greater than 3 seconds, before sending the next email, the software will pause at a random number of seconds ranging from 3 to the value you enter in this box.
+ Sender Name (29) box: You need enter the email sender's name here.
+ Subject (30) box: You enter the email subject here. In this email title, you can use spintax syntax or attach tags here.
- Spintax syntax has the form: {Keyword 1, Keyword 2, Keyword 3,..., Keyword N}
- Tags that can be applied to the email subject include: #CUSTNM#, #RANDOM#, #NUMBER#, #INVOICE#, #LETTERS#. For more details about these tags, you can see more in the description below.
+ CC (31), BCC (32) box: You enter the email addresses of the people you want to send additional emails to.
+ Body (33) box: You enter the content of your email body here. In this email body, you can use spintax syntax or attach all tags here.
+ HTML(34) option: If Body has html of content, so you can click on HTML option to tick it so Body can show content with html style.
+ TAGs (35):
- #CUSTNM#: If you insert this tag in Subject or Body so before one mail can send the client name can be changed for this tag.
- #EMAIL#: If you insert this tag in Body so before one mail can send the client email can be changed for this tag.
- #REMARK#: If you insert this tag in Body so before one mail can send data of client remark can be changed for this tag.
- #RANDOM#, #NUMBER#, #INVOICE#, #LETTERS#: If you insert this tag in Subject or Body so Before each email is sent, it inserts random numbers to replace those tags
- Test Spintax (36) button: You click on this button to test content of subject and body that's organized according to spintax syntax. It's ok so you can use it.
- Attachment (37) button: You click on this button to upload your attachment file for all mails that you can send for your clients.
- Random attachment name (38) option: If you want each email sent to have a different attachment name, you need to check this option.
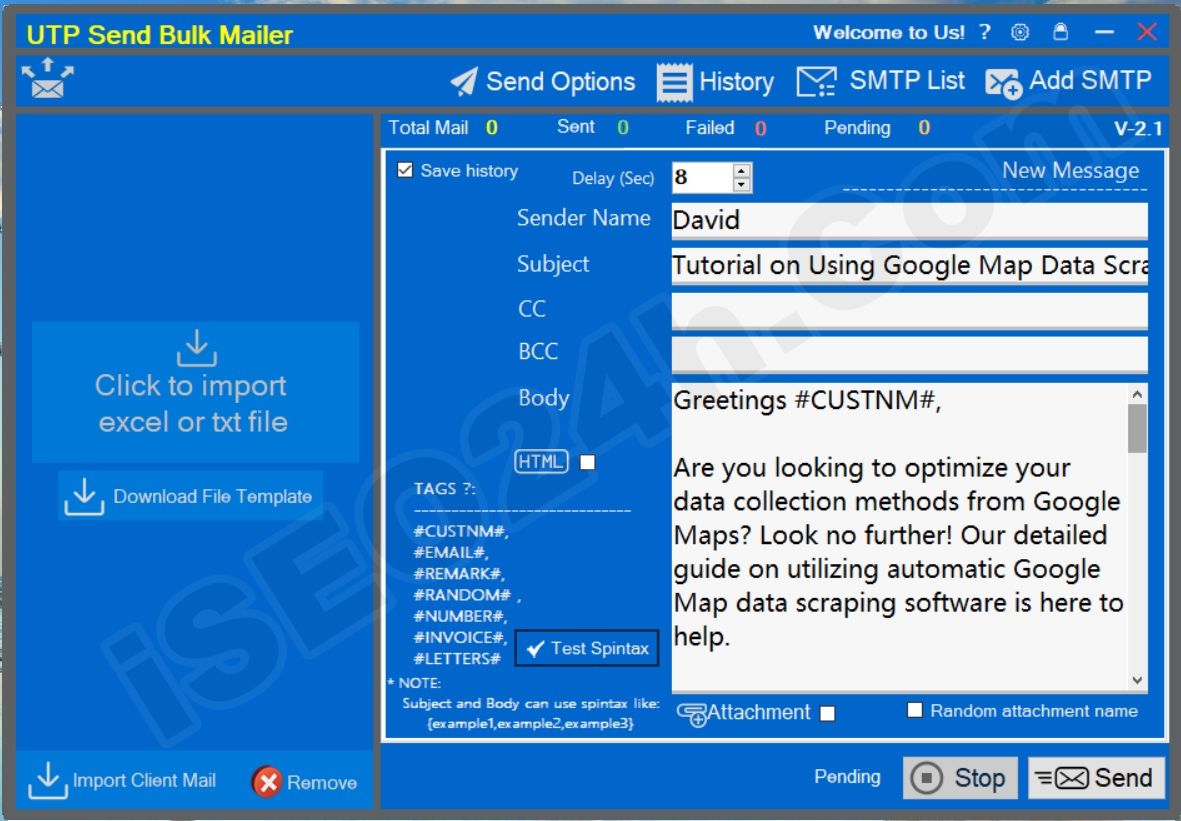
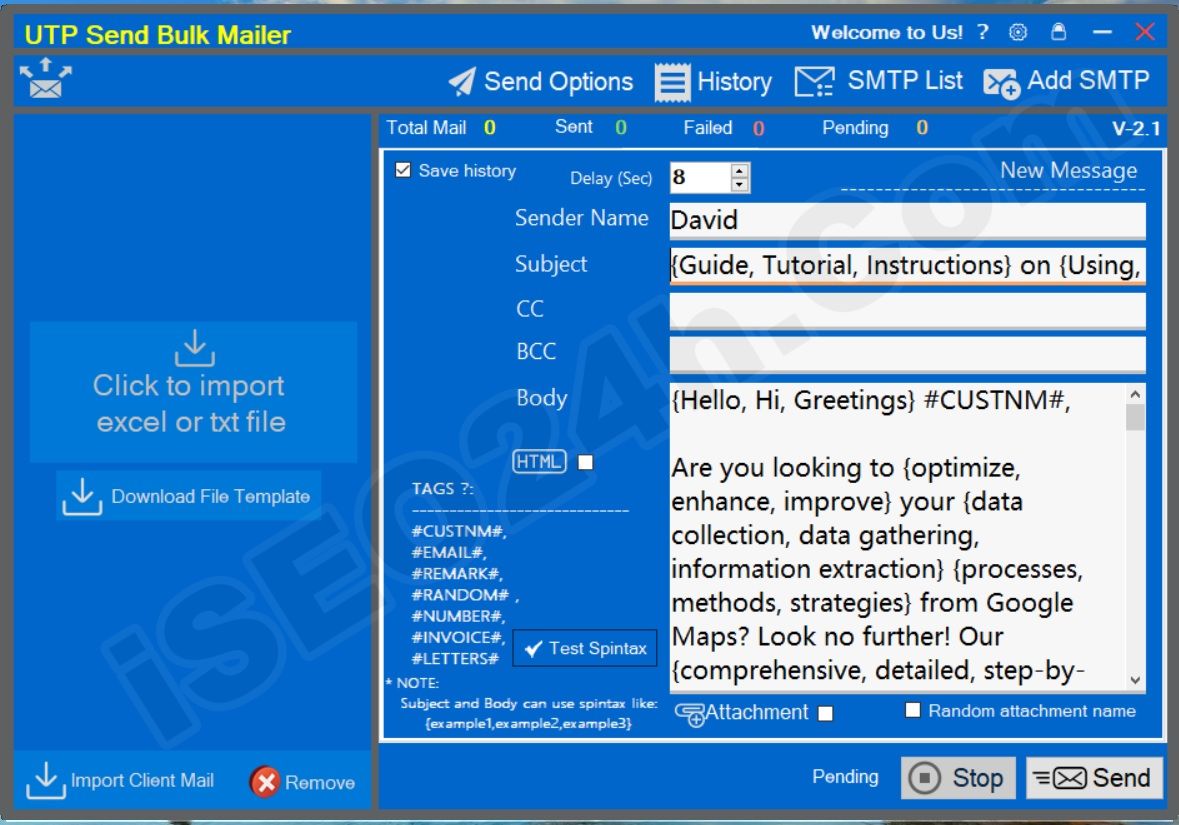
Picture 21: Organize email content without using spintax syntax
Tutorial on Using Google Map Data Scraping Software
Greetings #CUSTNM#,
Are you looking to optimize your data collection methods from Google Maps? Look no further! Our detailed guide on utilizing automatic Google Map data scraping software is here to help.
In this guide, you will discover how to efficiently gather important data from Google Maps using advanced software. This tool will save you time and ensure precise results.
Here’s what you can expect from this guide:
1. Detailed instructions on installing the software.
2. Best practices for enhancing your data extraction method.
3. Resolving potential problems you might come across.
4. Expert methods for maximizing the capabilities of the software.
Why is this essential for your business? With the rapidly expanding data volume available on Google Maps, using an efficient data scraping tool is a must-have. It enables you to stay ahead of the industry.
Get started your data extraction experience today with our straightforward guide. Access your guide now and change the way you collect data from Google Maps.
Detail of the document about this tool, you can see at: https://iseo24h.com/blog/how-to-scrap-data-from-google-map-automatically
#REMARK#
Best regards,
David
{Guide, Tutorial, Instructions} on {Using, Utilizing} {Google Map Data Scraping, Automatic Data Extraction from Google Maps} {Software, Tool, Application
{Hello, Hi, Greetings} #CUSTNM#,
Are you looking to {optimize, enhance, improve} your {data collection, data gathering, information extraction} {processes, methods, strategies} from Google Maps? Look no further! Our {comprehensive, detailed, step-by-step} guide on {using, utilizing} {automatic, automated} Google Map data {scraping, extraction} software {is here to help, is exactly what you need, will guide you through every step}.
In this {guide, tutorial, instruction manual}, you will {learn, discover, understand} how to {efficiently, effectively, seamlessly} {collect, extract, gather} {valuable, crucial, important} data from Google Maps {using, with the help of} {state-of-the-art, cutting-edge, advanced} software. This {tool, application, software} {is designed to, will} {save you time, make your job easier, streamline your workflow} and {ensure, guarantee} {accurate, reliable, precise} results.
Here’s what you can {expect, look forward to, anticipate} from this {guide, tutorial, instructions}:
1. {Step-by-step, Detailed, Comprehensive} {instructions, walkthrough, guidance} on {setting up, installing, configuring} the software.
2. {Tips, Strategies, Best practices} for {optimizing, enhancing, improving} your data extraction {process, workflow, method}.
3. {Troubleshooting, Resolving, Fixing} {common issues, potential problems, typical challenges} you might {encounter, face, come across}.
4. {Advanced, Pro, Expert} {techniques, methods, strategies} for {maximizing, leveraging, utilizing} the {full potential, capabilities, features} of the software.
Why is this {important, crucial, essential} for your {business, company, organization}? With the {ever-growing, rapidly expanding, continuously increasing} {amount of data, data volume, information} available on Google Maps, {having, possessing, using} an {efficient, reliable, powerful} data scraping tool is {a game-changer, essential, a must-have}. It {allows, enables, empowers} you to {gain insights, make informed decisions, stay ahead} of the {competition, market trends, industry.
Get started, Begin, Start} your {data scraping, data extraction} {journey, process, experience} today with our {easy-to-follow, user-friendly, straightforward} guide. {Download, Access, Get} your {copy, version, guide} now and {transform, revolutionize, change} the way you {collect, gather, extract} data from Google Maps.
Detail of the document about this {software,tool,application}, you can {refer,see,research} at: https://iseo24h.com/blog/how-to-scrap-data-from-google-map-automatically
#REMARK#
{Best regards, Sincerely, Warm regards},
David
Picture 22: Organize email content using Spintax syntax
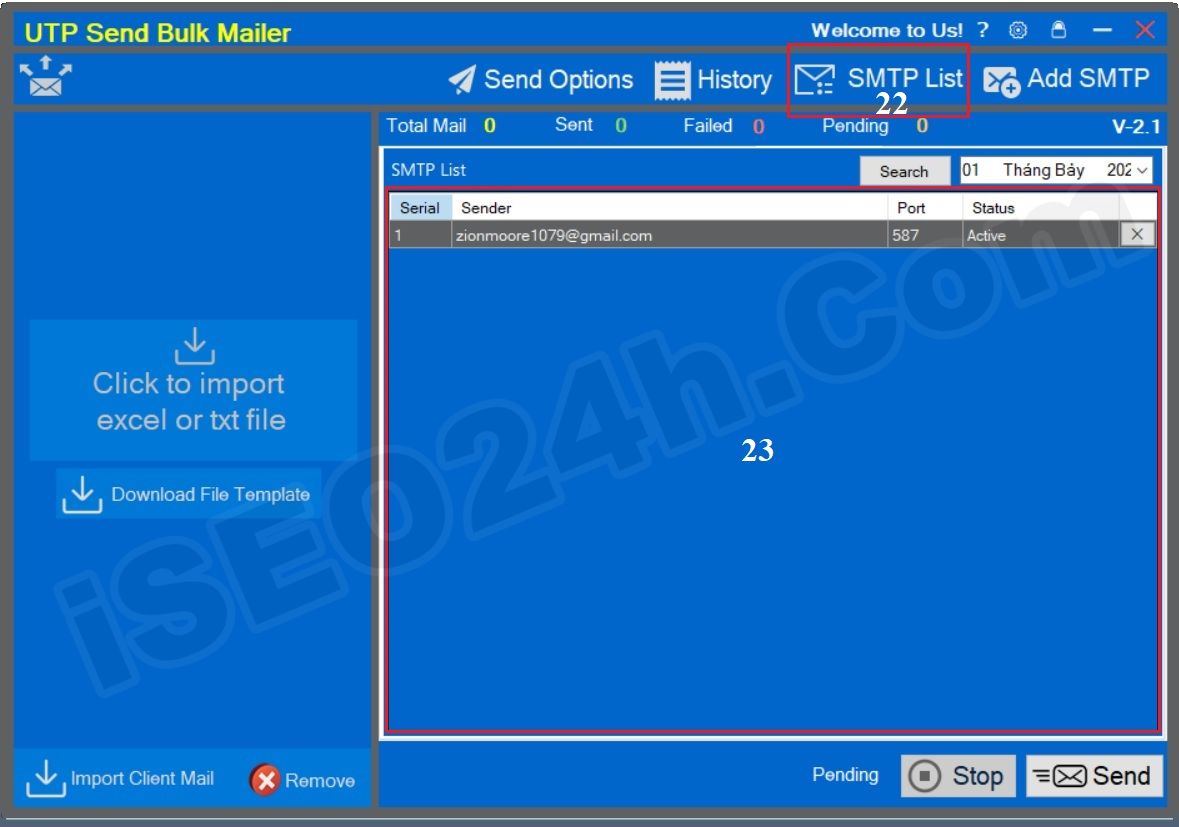
To execute a mass email sending campaign from this software, first you need to select the mail server by clicking the SMTP List button, then right-click on the appropriate mail server and select Active. You do as shown below:

Picture 23: Select the mail server before ordering mass mail sending
=> Now you click on SEND (43) button to command the software to send mass mail.
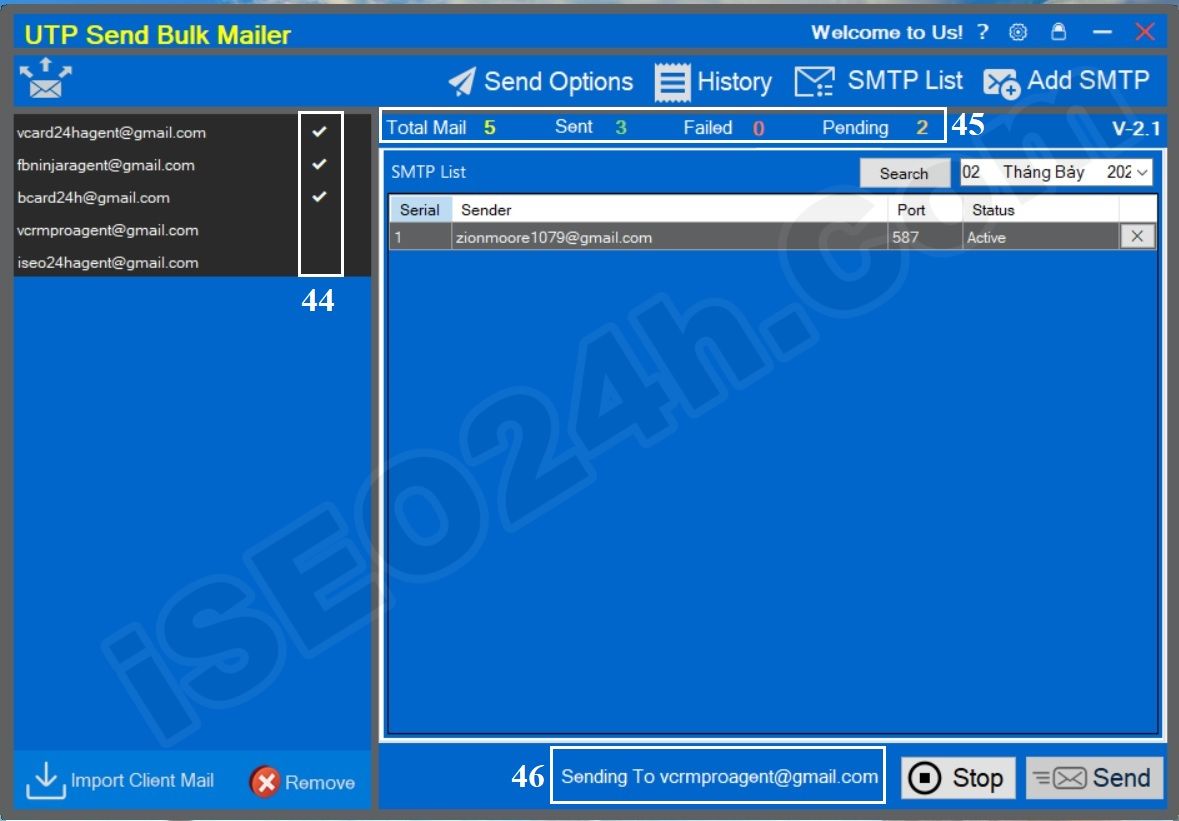
Picture 24: Interface for implementing the software's mass mailing campaign
* Notes:
+ 44th box: It displays the status of successful or failed mail sending. If it is successful, it displays a check mark, if it is not sent successfully, it displays an X;
+ 45th box: It displays a report on the results of mass mailing campaigns.
+ 46th box: It displays the status of being prepared to send to the corresponding email address.
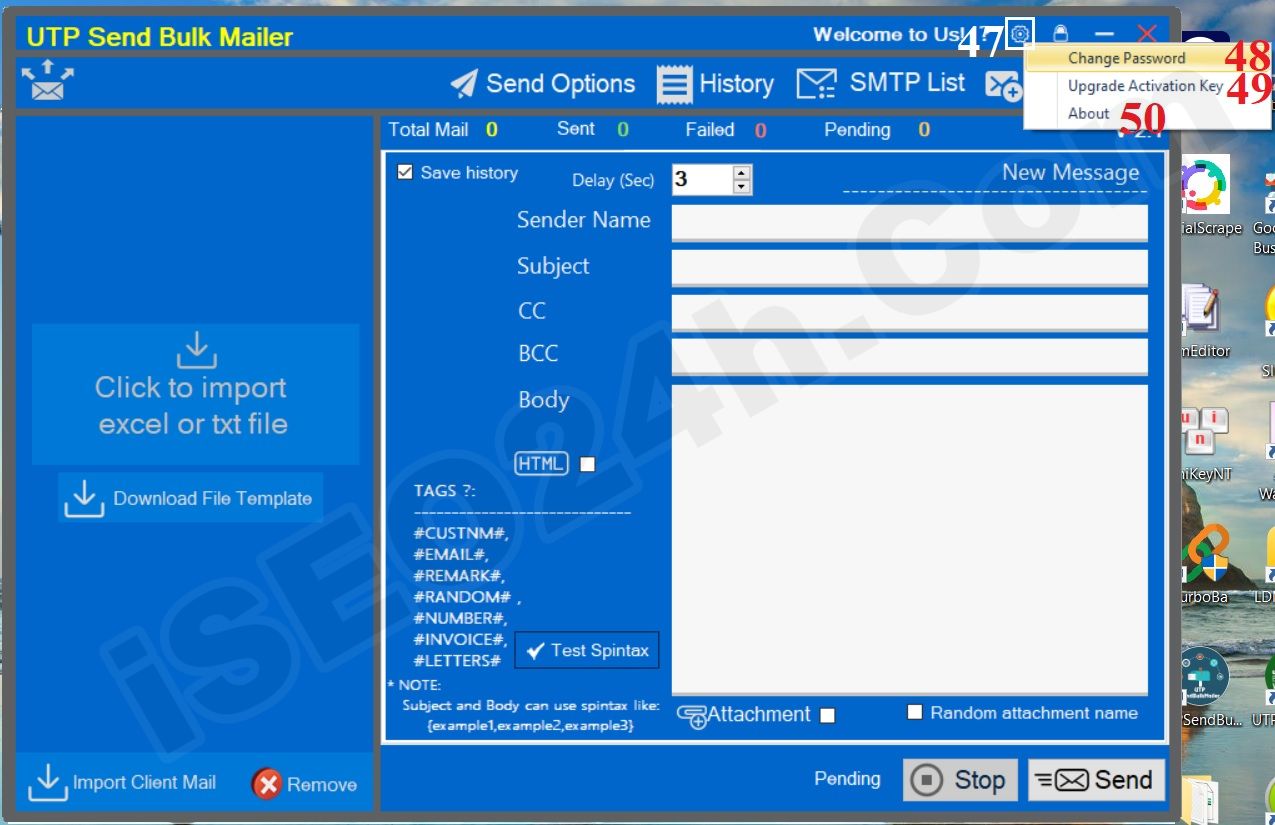
Picture 25: Other functions of the send bulk mail software
When you click on SETTING ICON (47) like picture 25th above so you can see 3 options:
+ Change Password (48) option: You click on this option to change your password.
+ Upgrade Activation Key (49) option: You click on this option to update your lisence of software;
+ About (50) option: You click on this option to view information about the license you are using. It includes the number of days to use the software, the number of days remaining to use the software, and the expiration date of the software.
Beside, when you click on LOCK ICON (that's near SETTING ICON) so the login's opening. You should use this option when you leave your computer with security for your software.
3.7. Video instructions for using the full software
Video instructions for using the full software
When using automated bulk email software, there are several important factors to consider to ensure the effectiveness of your email marketing campaign and avoid potential issues.
Here are the key points to note:
Ensure compliance with legal regulations for email marketing such as the CAN-SPAM Act in the US and GDPR in Europe, as well as other similar regulations. This includes providing an unsubscribe option in each email and not sending unwanted emails.
Collect emails legally and ethically. Avoid purchasing email lists or using non-transparent email collection methods. A high-quality email list helps improve open rates and engagement rates.
Use personalization features to create email content that is relevant to each recipient. This helps increase interaction and feedback from recipients.
The email subject line should be concise and informative, conveying the message at first glance. The subject line should be enticing to encourage recipients to open the email. It should be written with capitalizing the first letter of each word, avoiding all caps or excessive capitalization. The ideal length of the subject line is between 40 and 50 characters, not too short to be considered as spam by email servers, and not too long to be cut off and not displayed, which affects the recipient's experience. Additionally, the subject line should not contain spam keywords as listed below.
The email content should align with the subject line to avoid creating confusion. Avoid excessive capitalization, bolding, or colorful formatting. The content should be in black font only. The email content should be concise, to the point, and provide value to the recipient. Avoid excessive use of links, and each email should only contain one reputable link. The ideal length of the email body should be between 1/3 and 2/3 of an A4 page. Furthermore, it should not contain spam-related keywords as presented below.
Certain keywords and phrases that are often marked as unwanted by spam filters can affect your email being delivered to the spam folder. Here is a detailed list of common keywords and key phrases to avoid using in the email subject line and body content:
Keywords related to money and finance: Free, 100% free, Discount, Instant discount, Make money, Passive income, Money-back guarantee.
Keywords related to promotions and offers: Special offer, Promotion, Only today, Limited time, Last chance, Buy now, Get now.
Keywords related to urgency and importance: Take action now, Immediately, Act fast, Don't miss out, Time is running out, Final opportunity.
Keywords with absolute commitments: Guarantee, Commitment, Guaranteed, Fail-proof, 100% safe.
Keywords related to prizes and rewards: Free gift, Win now, Prize, Lucky.
4.4.2. Keywords and phrases considered spam when used in the email body content
Keywords related to money and finance: Cash, Profit, No fees, Low interest rate, Increase income.
Keywords related to promotions and offers: Completely free, Discount coupon, Voucher, Super discount, Surprisingly cheap.
Keywords related to urgency and importance: Urgent, Immediate, Instantly, Must act now, Cannot be ignored.
Keywords with absolute commitments: Absolute, Absolute safety, No risk, Immediate results, Nothing to lose.
Keywords related to prizes and rewards: Big reward, Lucky draw, Totally free, Win, Receive rewards instantly.
Keywords related to health and beauty: Lose weight, Miracle, Forever young, Free of cost.
Other keywords: Click now, Click here, Unbelievable, Best, One time only, Secret.
4.4.3. Other considerations
Avoid using all caps for keywords: Using all caps for words or phrases is often considered spam.
Avoid excessive use of exclamation marks: Using too many exclamation marks (!) may cause your email to be marked as spam.
Check text-to-image ratio: Emails with too many images and little text are often filtered into the spam folder.
By avoiding the above-mentioned keywords and phrases, you can reduce the risk of your email being marked as spam, thereby increasing open rates and recipient engagement.
4.5. Optimize email design
The email design should be clear, easy to read, and mobile-friendly. Use images, links, and well-placed calls to action (CTAs) to grab the recipient's attention.
Utilize analytics and reporting tools to track important metrics such as open rates, click-through rates, conversion rates, and unsubscribe rates. Use this data to adjust and optimize your email marketing campaigns.
Before sending bulk emails, thoroughly check the content, links, and email formatting to ensure there are no errors. Send test emails to a small group before sending them to the entire email list.
Monitor feedback from recipients and promptly and professionally handle unsubscribe requests. This helps maintain a good reputation and compliance with email marketing regulations.
Protect the personal data of recipients and ensure that the software you use has necessary security measures to prevent data leaks.
Remove invalid or inactive email addresses to maintain a clean and up-to-date email list. This helps improve the success rate of email deliveries and open rates.
By paying attention to these factors, you can optimize your email marketing campaigns, enhance customer interactions, and achieve the best results from using automated bulk email software.
Currently, the Free version is limited to importing a maximum of 5 clients. Therefore, for each mass email campaign, you can only send it to a maximum of 5 clients.
To send unlimited bulk mail, you need to upgrade to the paid version
At the moment, This software has Three Packages:
+ Monthly Package: Its pricing is $25/month; 
+ 3 Months Package: Its pricing is $55/3months;
+ 6 Months Package: Its pricing is $79/6months;
+ Yearly Package: Its pricing is $99/12months;
5.2.1. Step 1: Choose the package that you want from 5.1. After that you click on "Buy now with PayPal" button and pay for the package that you choose;
5.2.2. Step 2: After you finish Step 1. You send us email with your bill information via email: iSEO24hAgent@Gmail.com or Telegram: https://t.me/slimInvoices;
5.2.3. Step 3: You open UTPSendBulkMailerPro software => Then you click on SETTING ICON (47) like picture 25th above => then you click on Upgrade Activation Key (48) like picture 25th above;
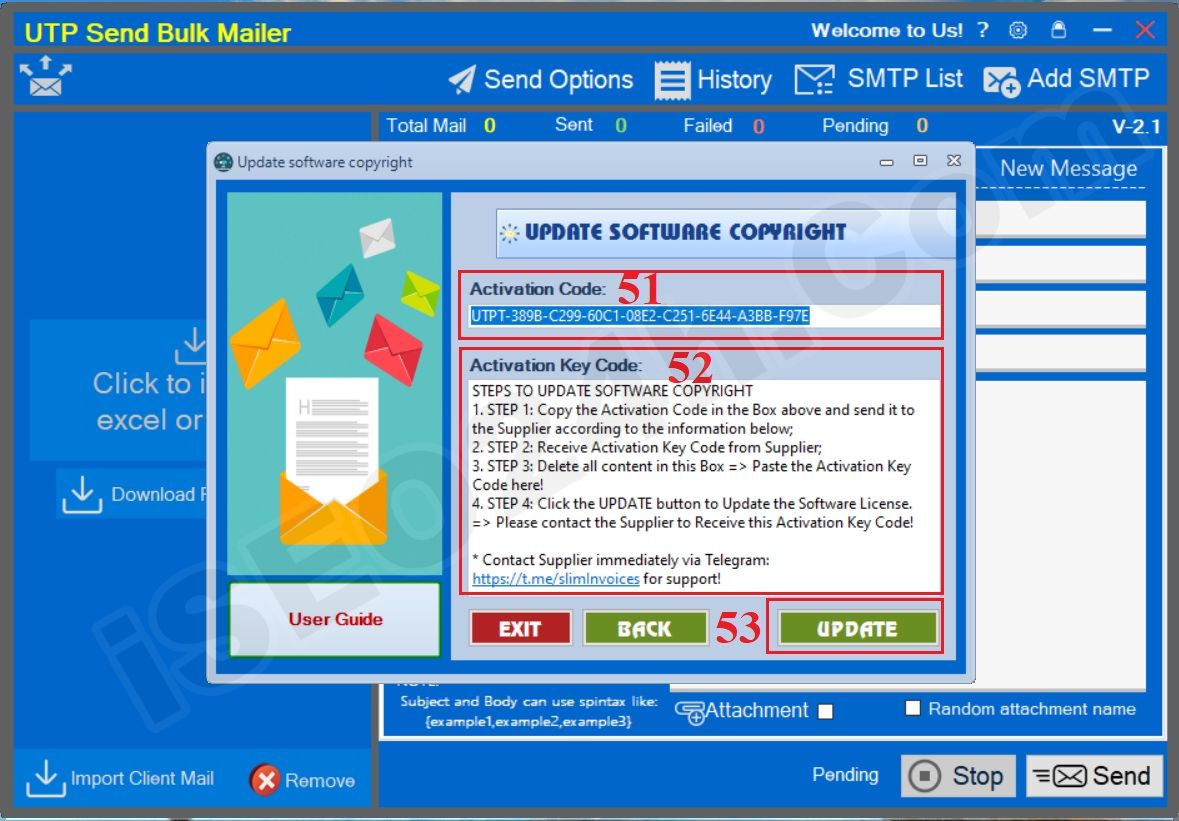
Picture 26: How to upgrade to the unlimited license?
5.2.4. Step 4: You send us Your Activation Code (51) (like 51th red box in Picture 26th above) via email: iSEO24hAgent@Gmail.com or Telegram: https://t.me/bizToolsSupport;
5.2.5. Step 5: We're sending the Activation Key Code To you => Then you delete all things in Activation Key Code (52) (like 52th red box in Picture 26th above) => Next you paste your Activation Key Code there => Final, you click on UPDATE (53) button to upgrade your lisence.
=> Now, you can use this software with unlimited!
=> That's All!
If you have any questions about this software, please contact us with the following information:
+ Email: iSEO24hAgent@Gmail.com
+ Telegram: https://t.me/bizToolsSupport


